Export the data with WP All Export
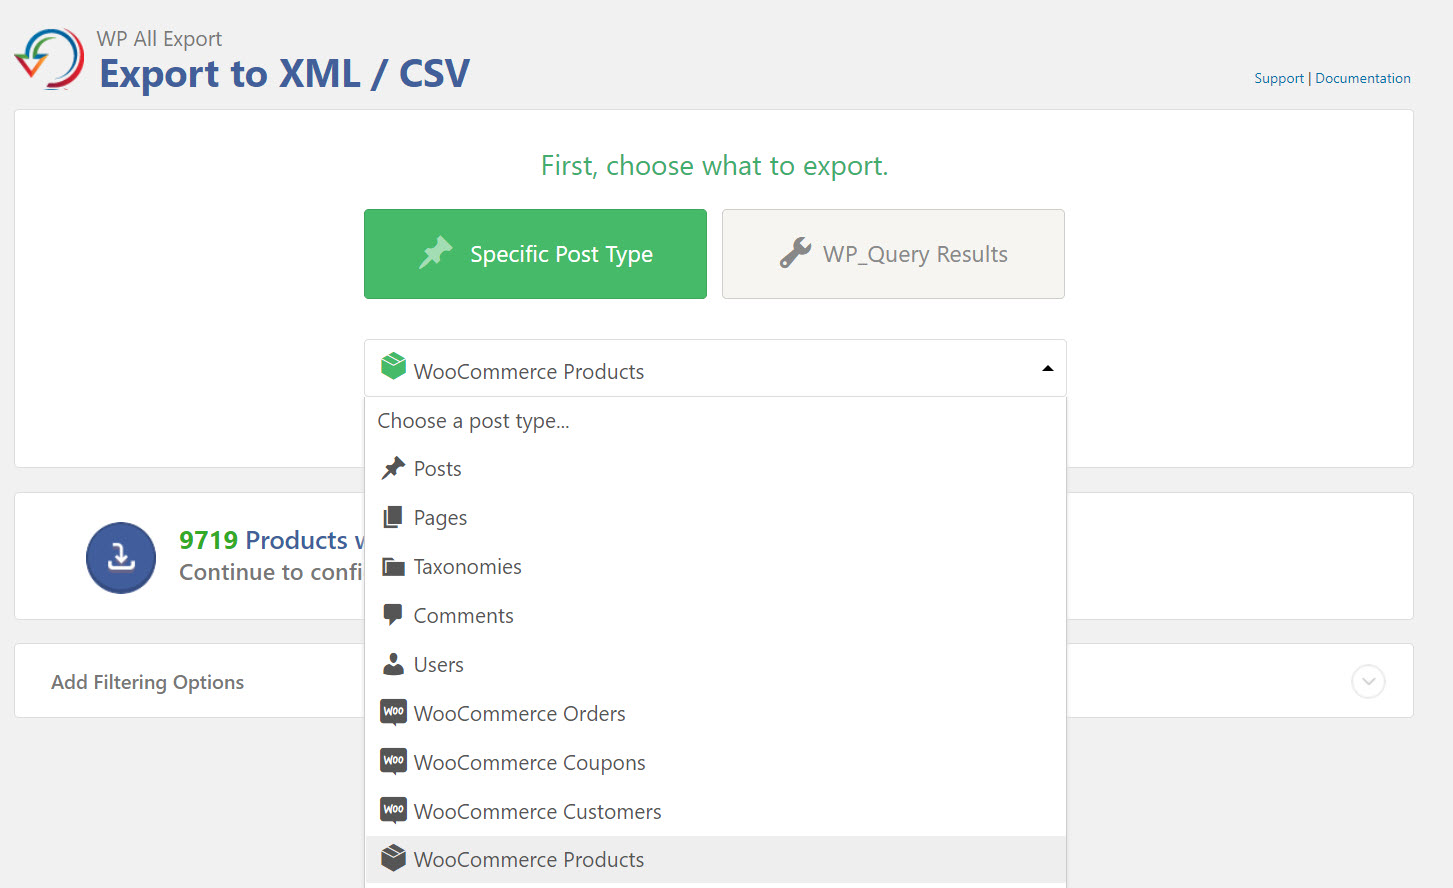
First, we need some product data to work with. Head to WP All Export and select Specific Post Type. In the drop-down, find “WooCommerce Products”. Then in the options below, click the Customise Export button.
When you customise your export, you perhaps don’t need every attribute in the CSV. I have a preset export template that looks a little like this:

The main data points I tend to always use are short, text-based descriptors such as title, tags, colour and category.
By the way, don’t be greedy. If you use the actual product description for the fuzzy matching process below, you’ll quickly run out of power. There are too many characters for Fuzzy match to be able to handle.
Download your data and open Excel.
Processing the data in Excel with Fuzzy Lookup
Firstly, create an Excel file. Mine’s called “Playground with transpose” it’s an exciting and appropriate name because I’m going to be creating a macro to do a bit of clever transposing later on.
For now, here are the important details:
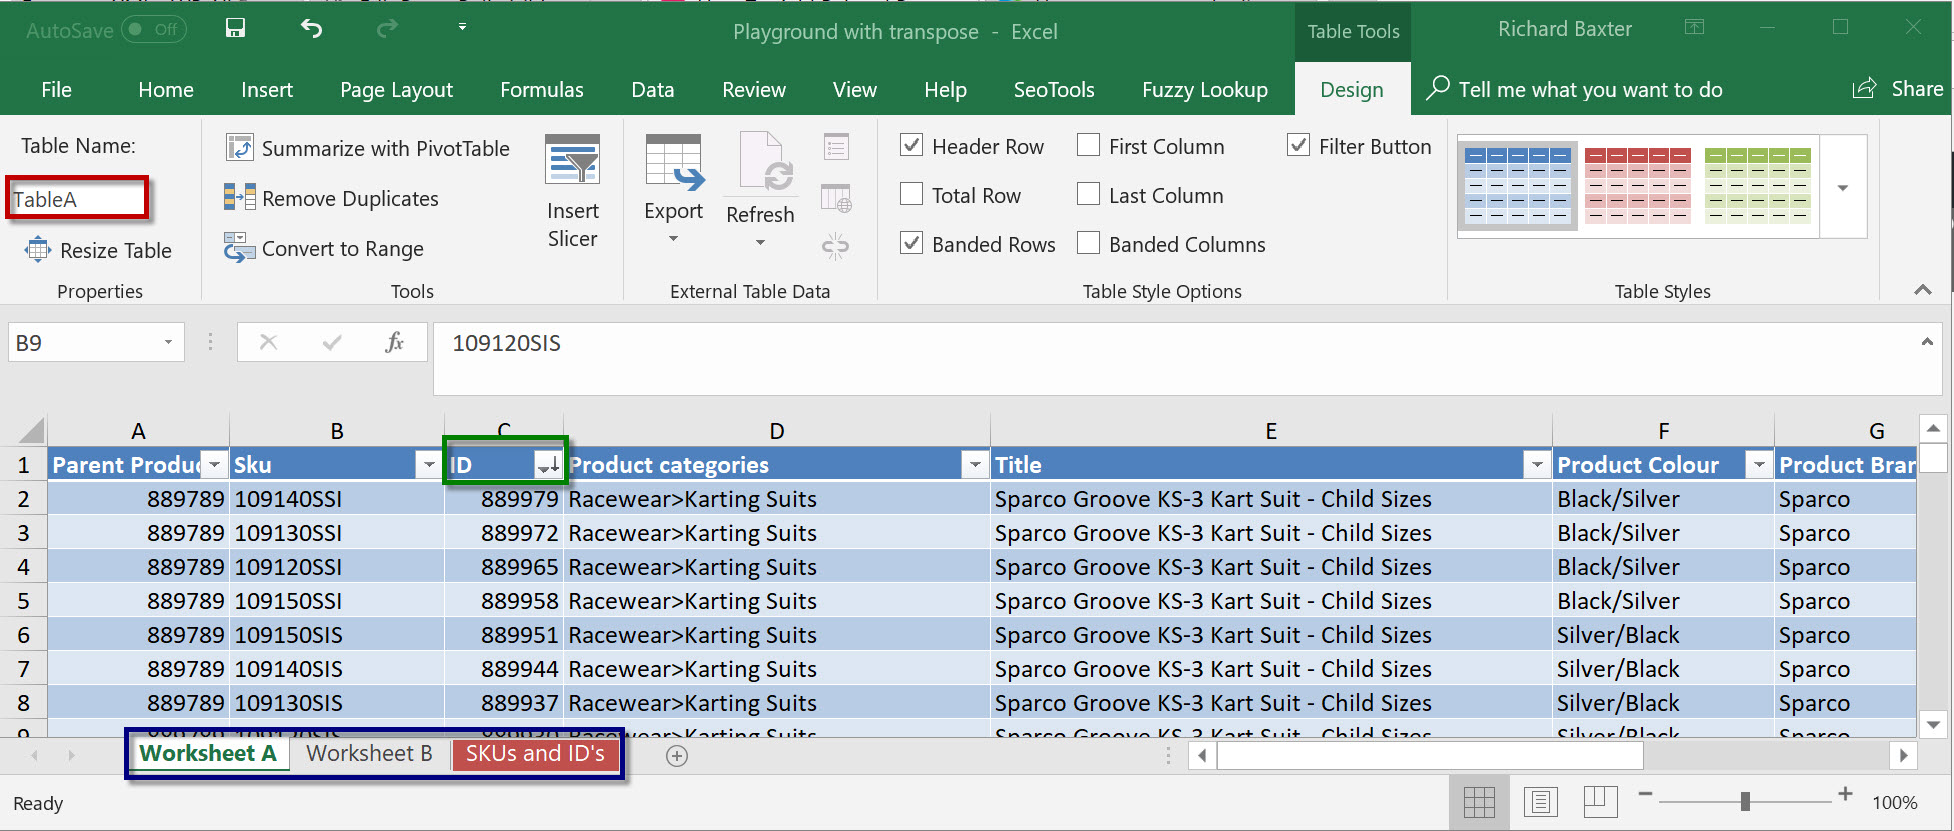
I’ve created two identical data tables on Worksheet A and Worksheet B (highlighted in blue), sorted in opposite order by ID value (highlighted in Green).
Why two tables? Fuzzy match works from two tables and in a linear fashion, so I believe that having two tables in reverse order of each other will allow the tool to deliver a good breadth of matches. I could be wrong about the linearity; it’s just a hunch but seems to work well. You could also sort by page views or order volume as a measure of popularity. This is where data from external sources could add an awful lot of value to the results!
I’ve named each table very imaginatively as TableA and TableB (highlighted in red).
Next, I’m going to head to the Fuzzy Lookup tab. Make sure it’s installed, create a new tab (I’ve called mine “Fuzzy”) and click the Fuzzy Toolbar button.
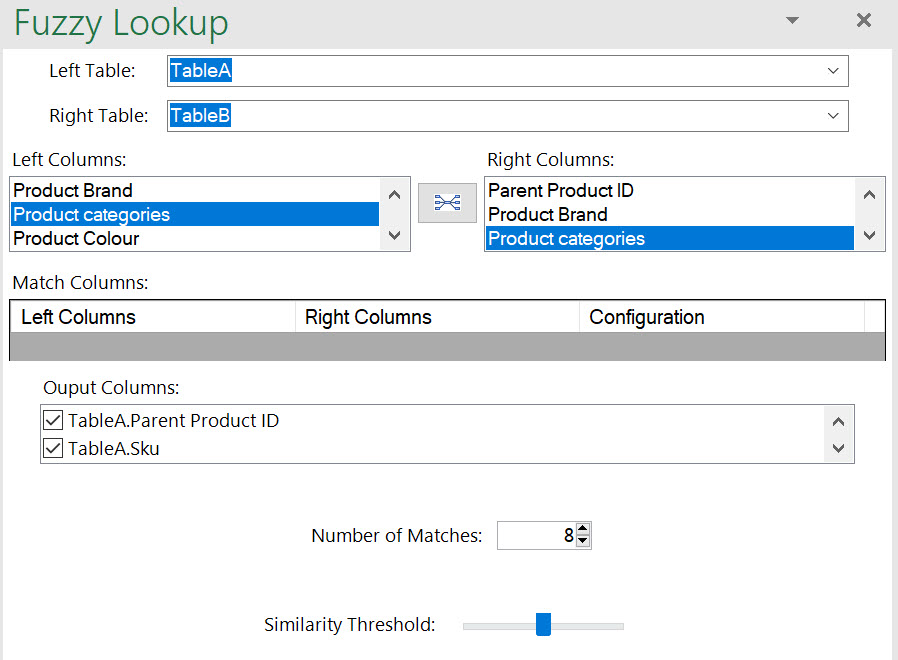
You need to think about the data points you match on and in what order. This is very definitely a place for trial and error.
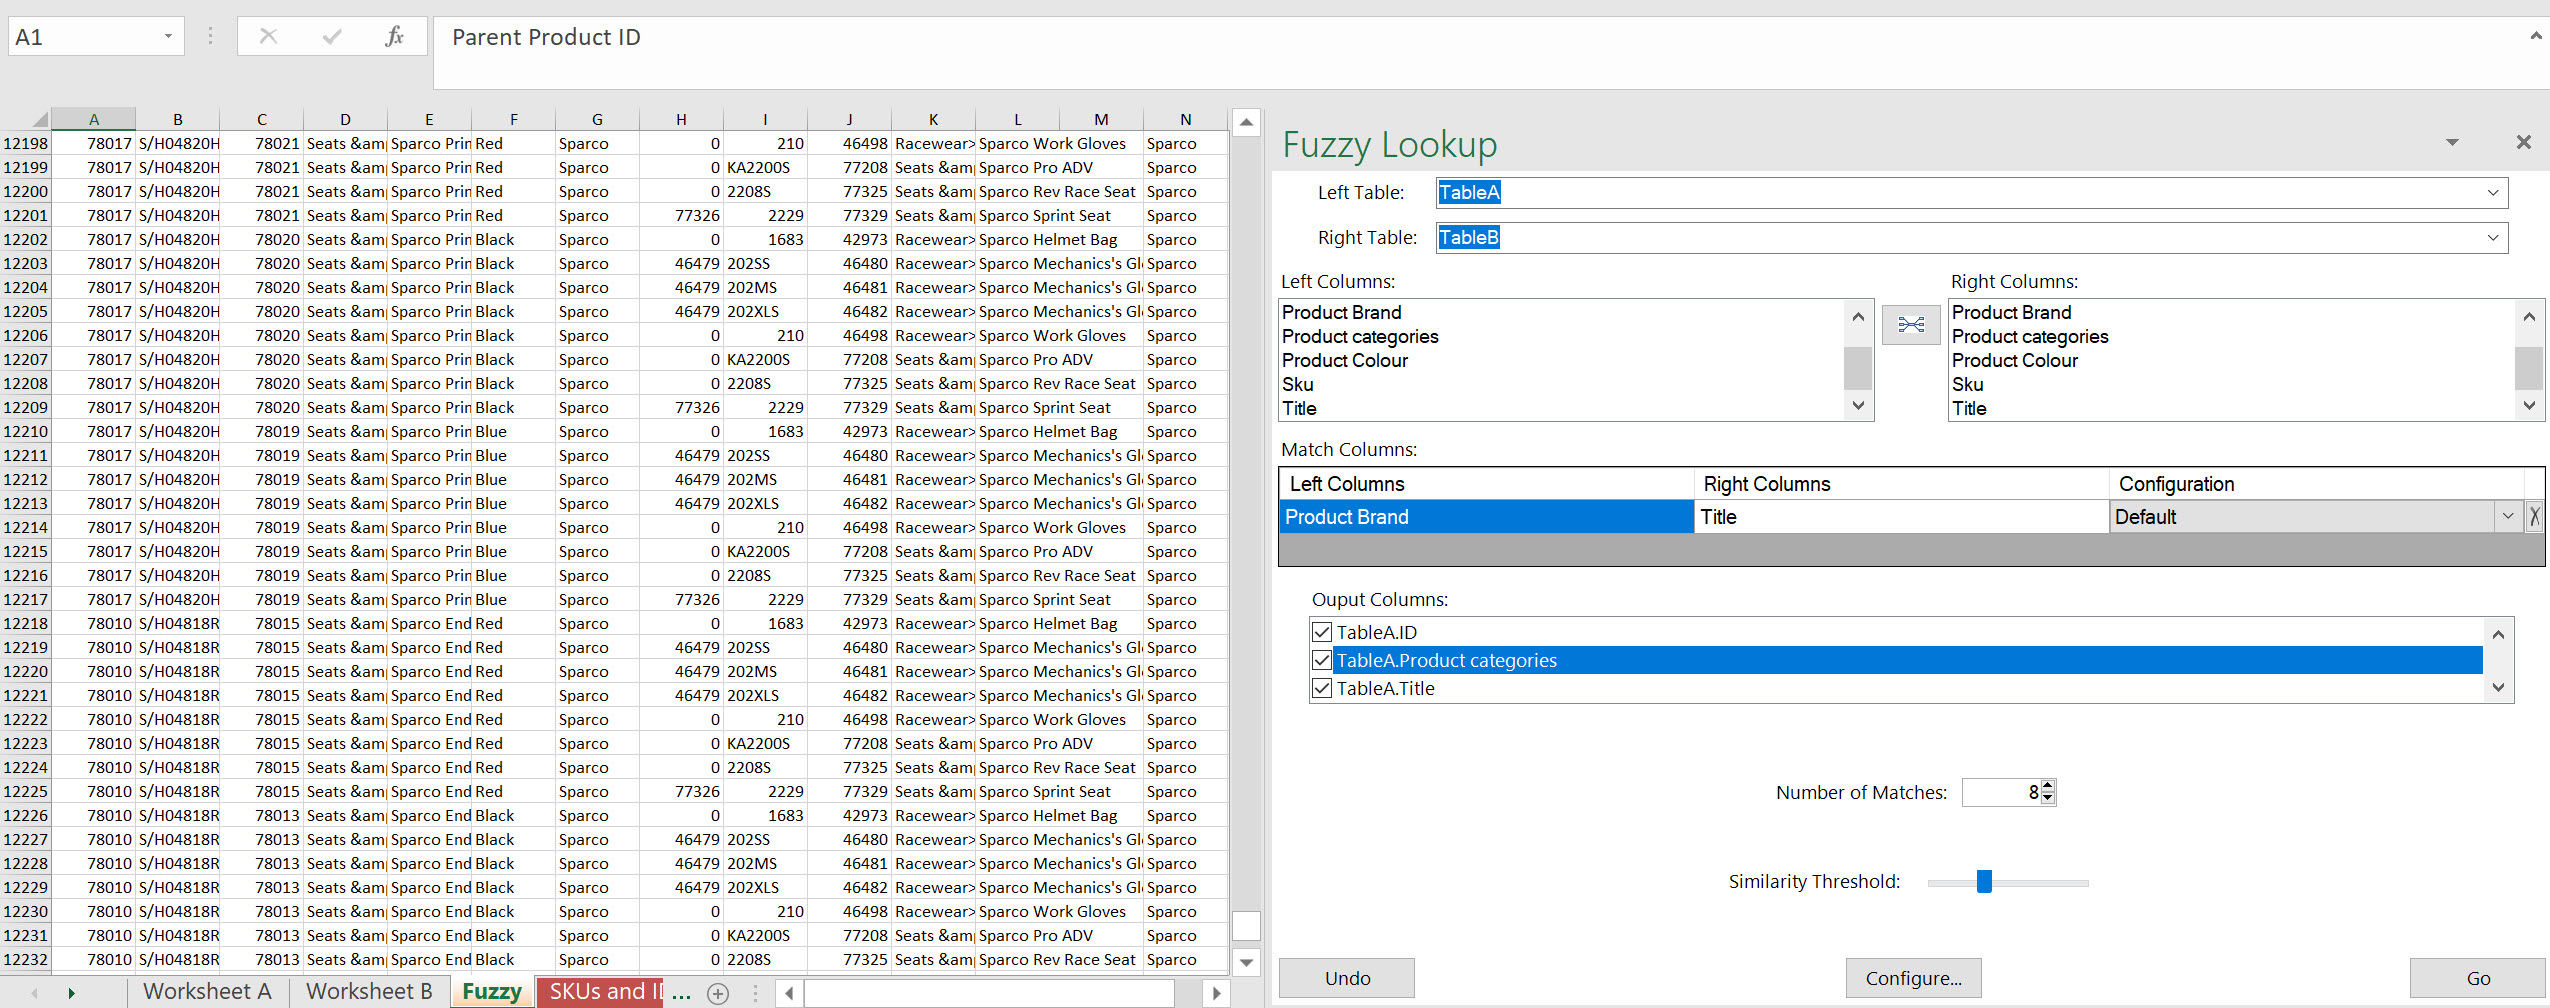
In my example, I’m going to match by Product Category, then Brand for simplicity. You could match by Colour and Product Title (or lots of unique combinations). It’s just something that would be unique to the type of products you have.
I deselect most output columns for my production data as you’ll end up with duplicates – but make sure you’re keeping what you need and don’t be scared to throw away the results and try something new.
Save your spreadsheet! When you click “Go” you’ll immediately wish you had as Excel will look like it’s crashed and your laptop cooling fan will spin up:
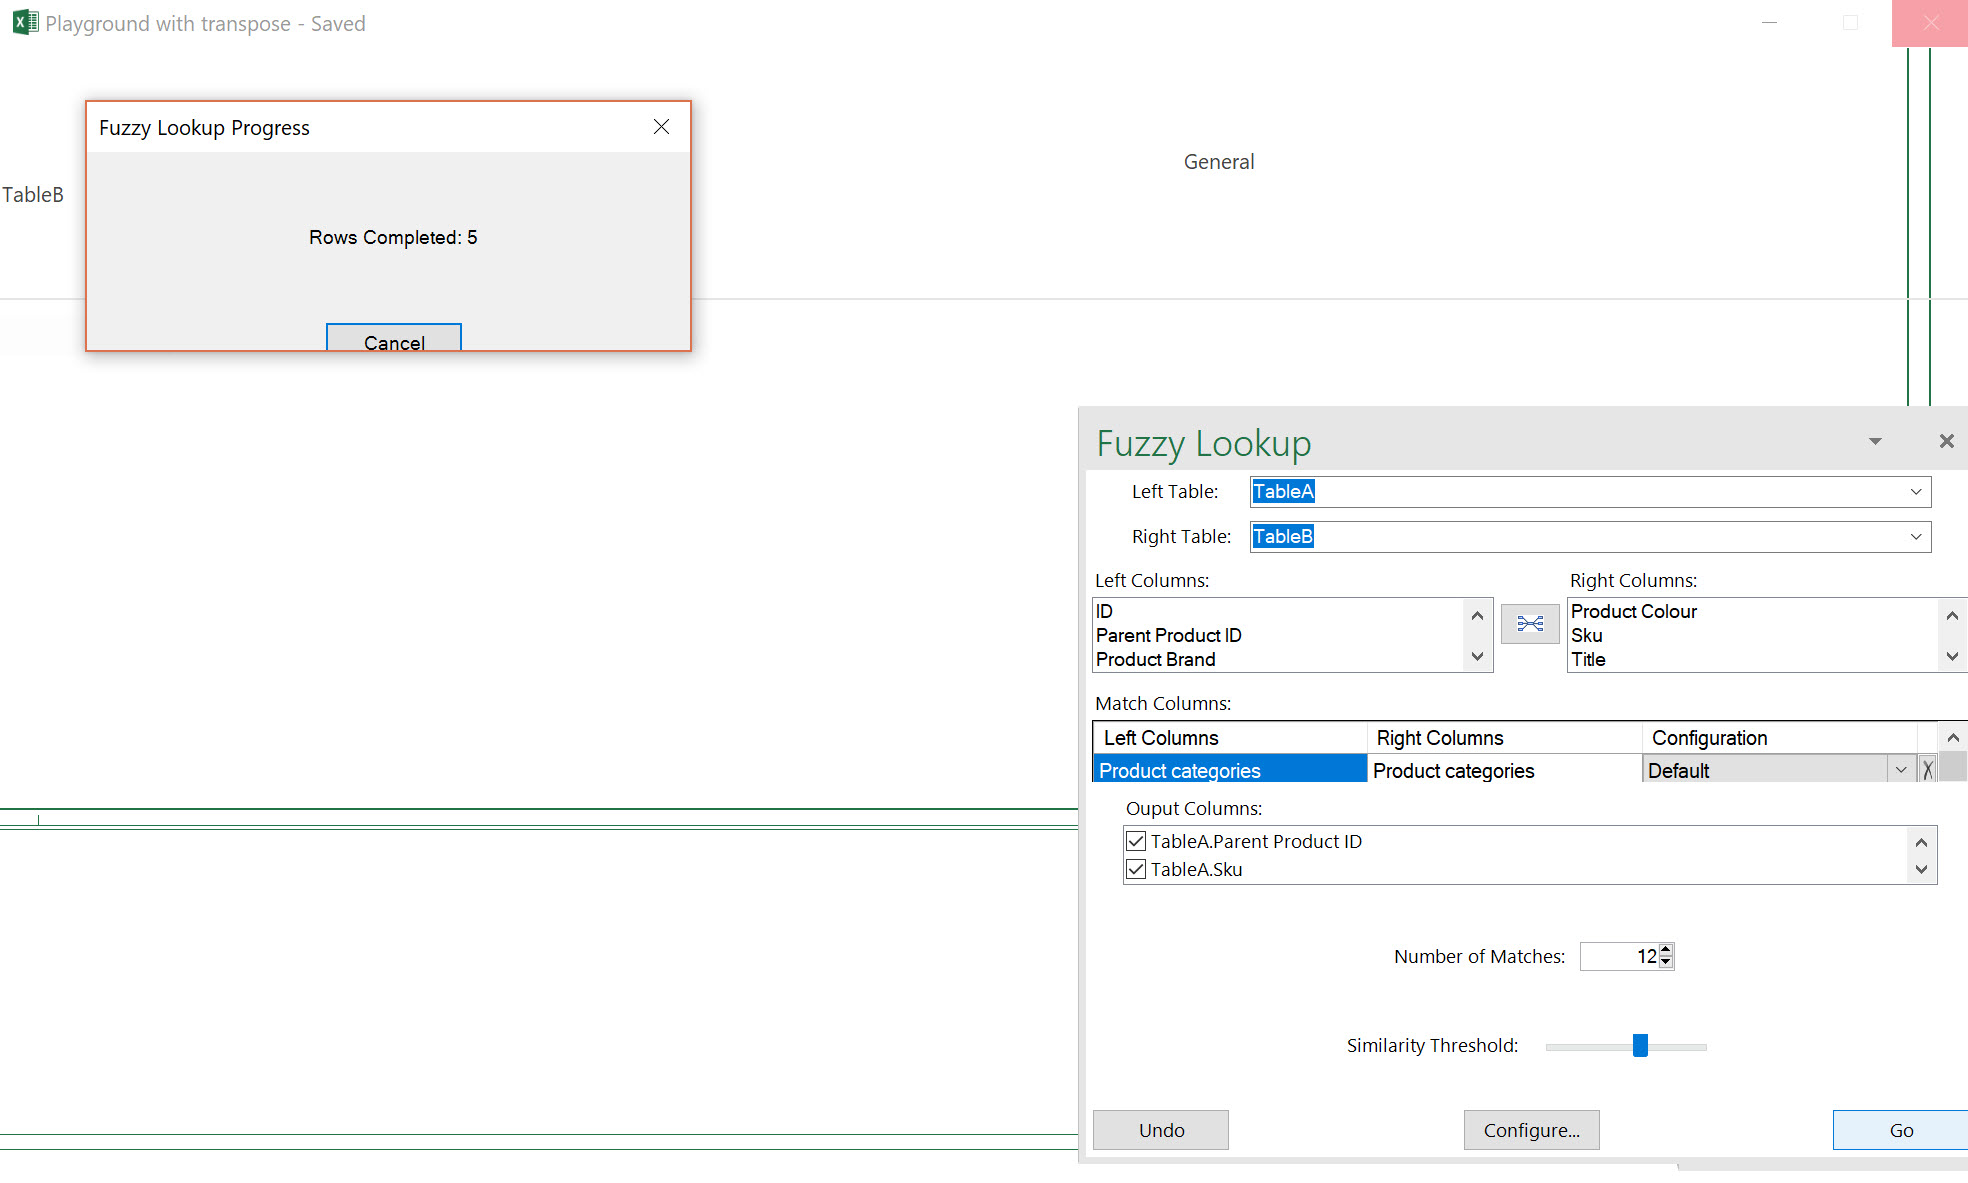
After a bit of time, you end up with a result. I have to admit – 12 related matches on two match columns was too much for my little i7 processor to handle, so I switched down to 8.
Naturally, it’s important to check you’re happy with the outcome and re-run the process if not. There are lots of different ways you can match products to similar products and lots of ways to sort the match order (sales volume, view count and so on), so don’t just settle for the first result!
Prepare the data for upload
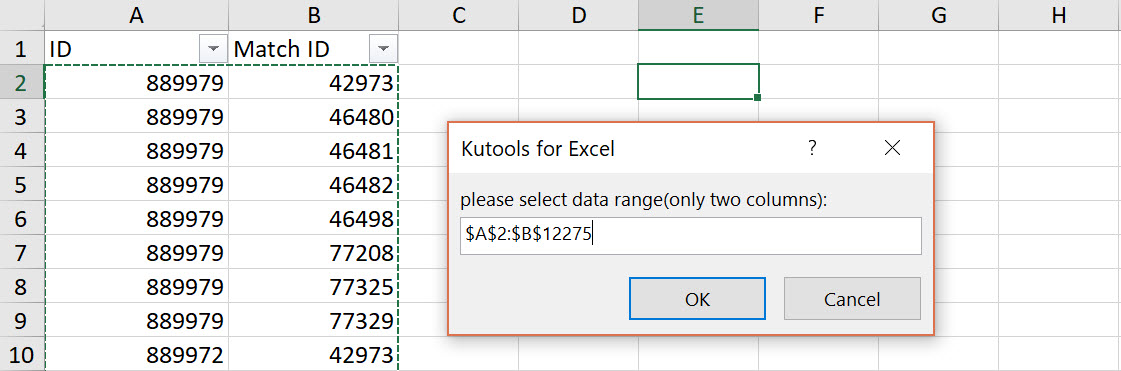
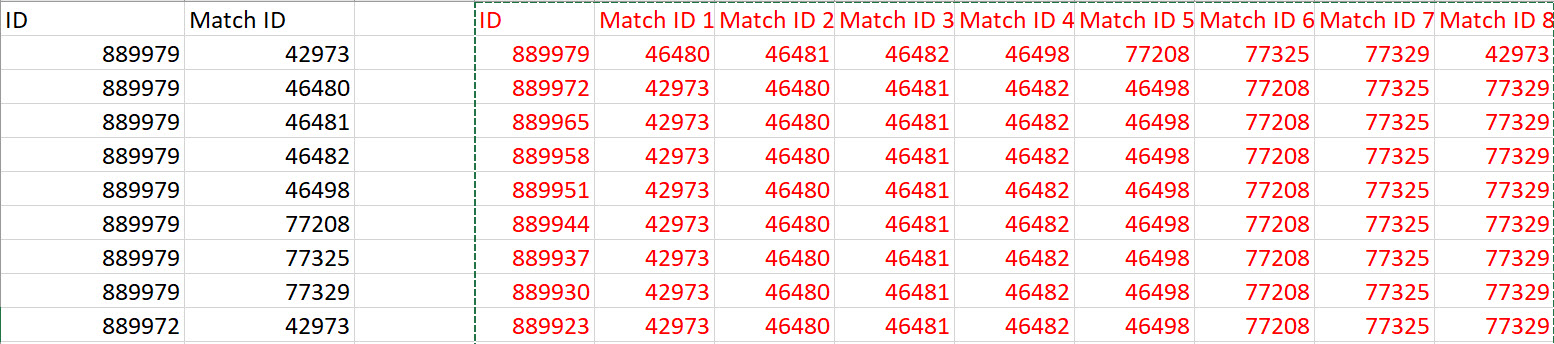
For this next step, you need to copy the product ID list from the left and the product ID list from the right into a new table:
| ID | MATCH ID |
| 1234 | 456 |
| 1234 | 457 |
| 1234 | 458 |
| 1234 | 1234 |
It’ll look something like what’s above, only longer.
Once you’ve created your table, you’ll see the problem. It’s a 2 column table with many duplicates in the left-hand column and some duplicates in the right. Duplicates between the left and right columns would mean your related products would recommend themselves, so best to clean that up. Managing the duplicates in this way is easy, you can just use =EXACT() to find them and delete.
Transpose the data into columns
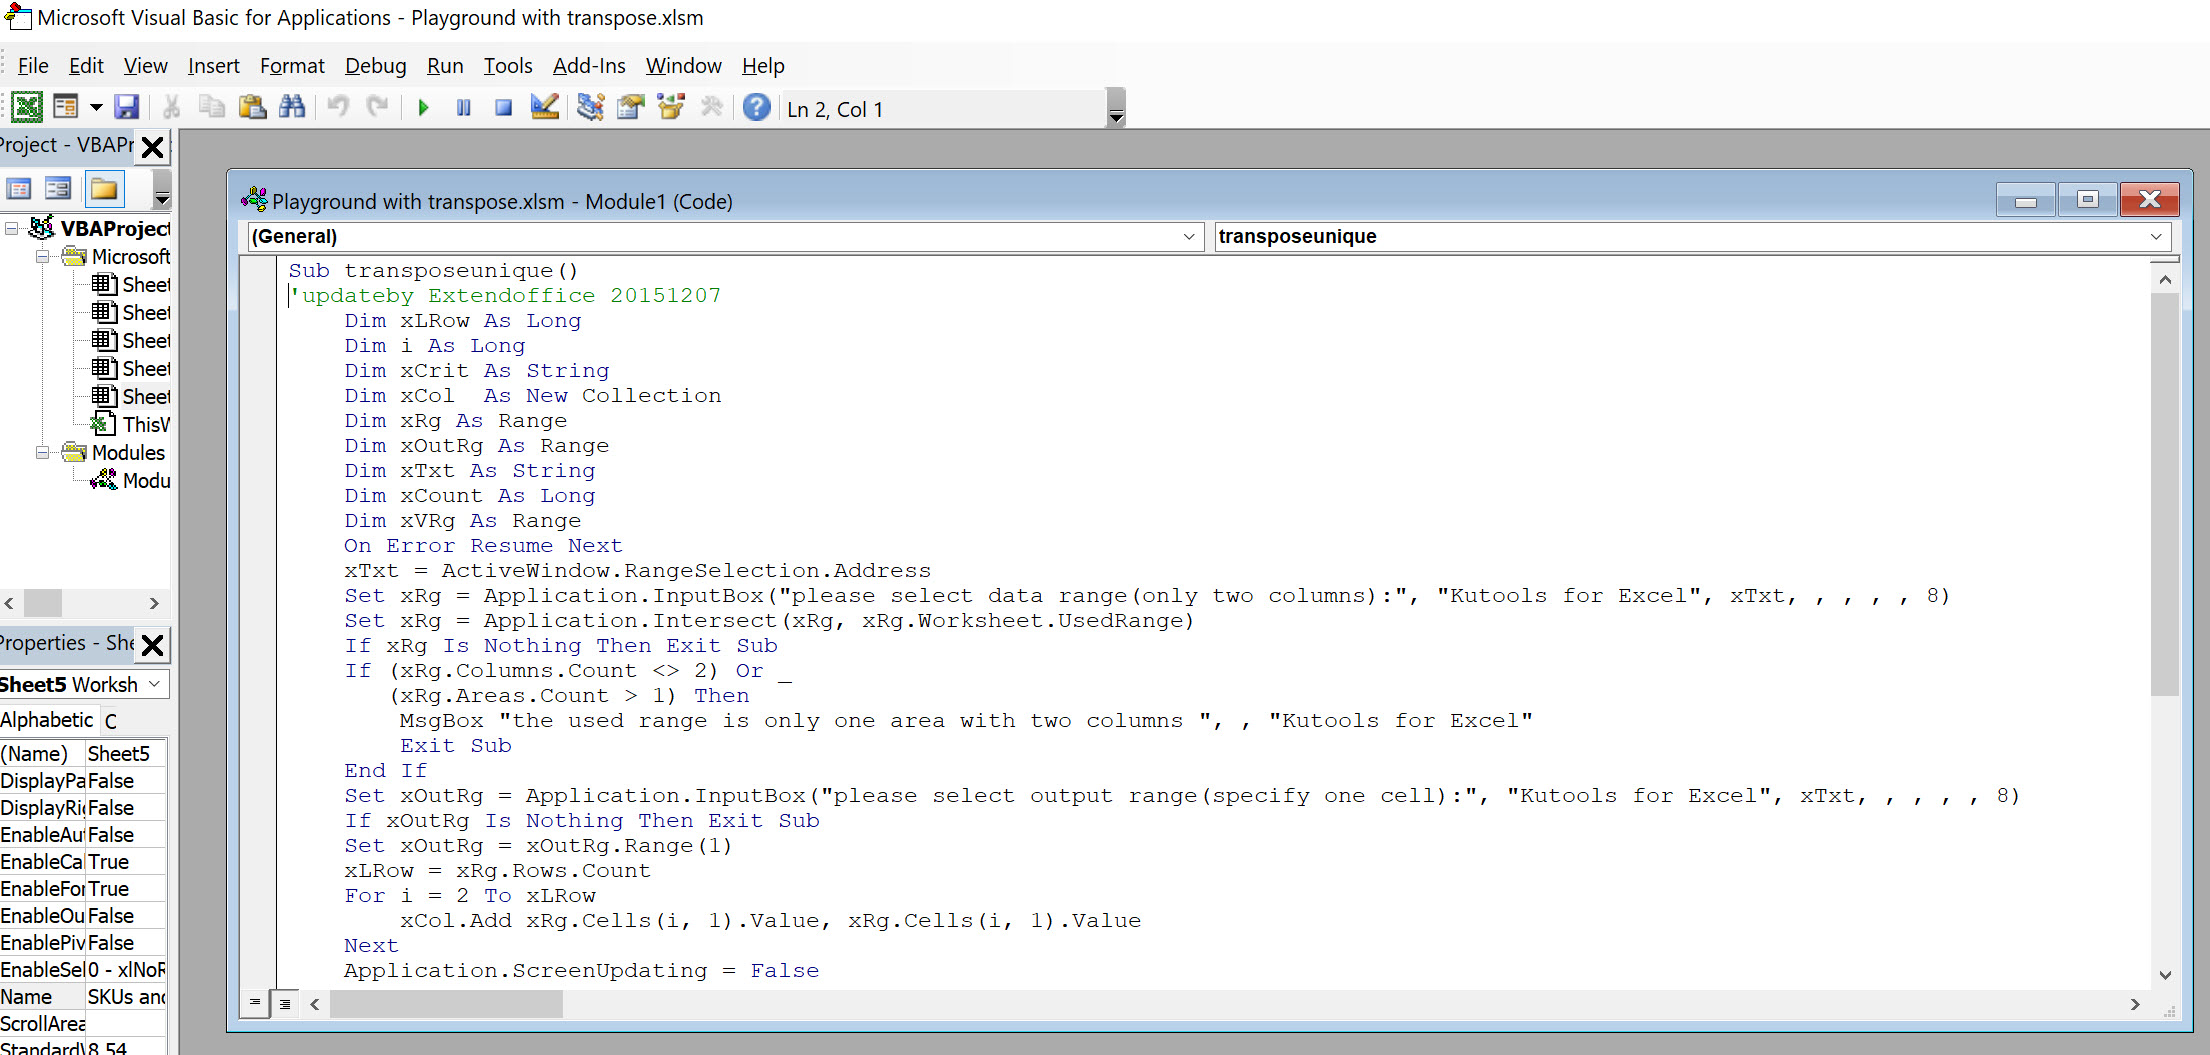
When you’re done, we still have the problem of many duplicate IDs in the left hand column, so we need to transpose the duplicate rows in to columns in Excel. This handy VBA Macro from KuTools is an absolute lifesaver:
Sub ConvertTable()
  'Update 20150113
  Dim xArr1 As Variant
  Dim xArr2 As Variant
  Dim InputRng As Range, OutRng As Range
  Dim xRows As Long
  xTitleId = "KutoolsforExcel"
  Set InputRng = Application.Selection
  Set InputRng = Application.InputBox("Range :", xTitleId, InputRng.Address, Type:=8)
  Set OutRng = Application.InputBox("Out put to (single cell):", xTitleId, Type:=8)
  Set OutRng = OutRng.Range("A1")
  xArr1 = InputRng.Value
  t = UBound(xArr1, 2): xRows = 1
  With CreateObject("Scripting.Dictionary")
      .CompareMode = 1
      For i = 2 To UBound(xArr1, 1)
          If Not .exists(xArr1(i, 1)) Then
              xRows = xRows + 1: .Item(xArr1(i, 1)) = VBA.Array(xRows, t)
              For ii = 1 To t
                  xArr1(xRows, ii) = xArr1(i, ii)
              Next
          Else
              xArr2 = .Item(xArr1(i, 1))
              If UBound(xArr1, 2) < xArr2(1) + t - 1 Then
                  ReDim Preserve xArr1(1 To UBound(xArr1, 1), 1 To xArr2(1) + t - 1)
                  For ii = 2 To t
                      xArr1(1, xArr2(1) + ii - 1) = xArr1(1, ii)
                  Next
              End If
              For ii = 2 To t
                  xArr1(xArr2(0), xArr2(1) + ii - 1) = xArr1(i, ii)
              Next
              xArr2(1) = xArr2(1) + t - 1: .Item(xArr1(i, 1)) = xArr2
          End If
      Next
  End With
  OutRng.Resize(xRows, UBound(xArr1, 2)).Value = xArr1
End Sub
To create a Macro, copy this code and head to View > Macros. Give it a name, “TransposeUnique” and click “Create”. Paste the code into the Macro editor and save it.
Then, press the F5 key to run the Macro or head back to View > Macros, select your new Macro and click “Run”.
Once the Macro has run, your table is ready! I copy the results to a new tab and then save that as a csv file:
Upload into WooCommerce
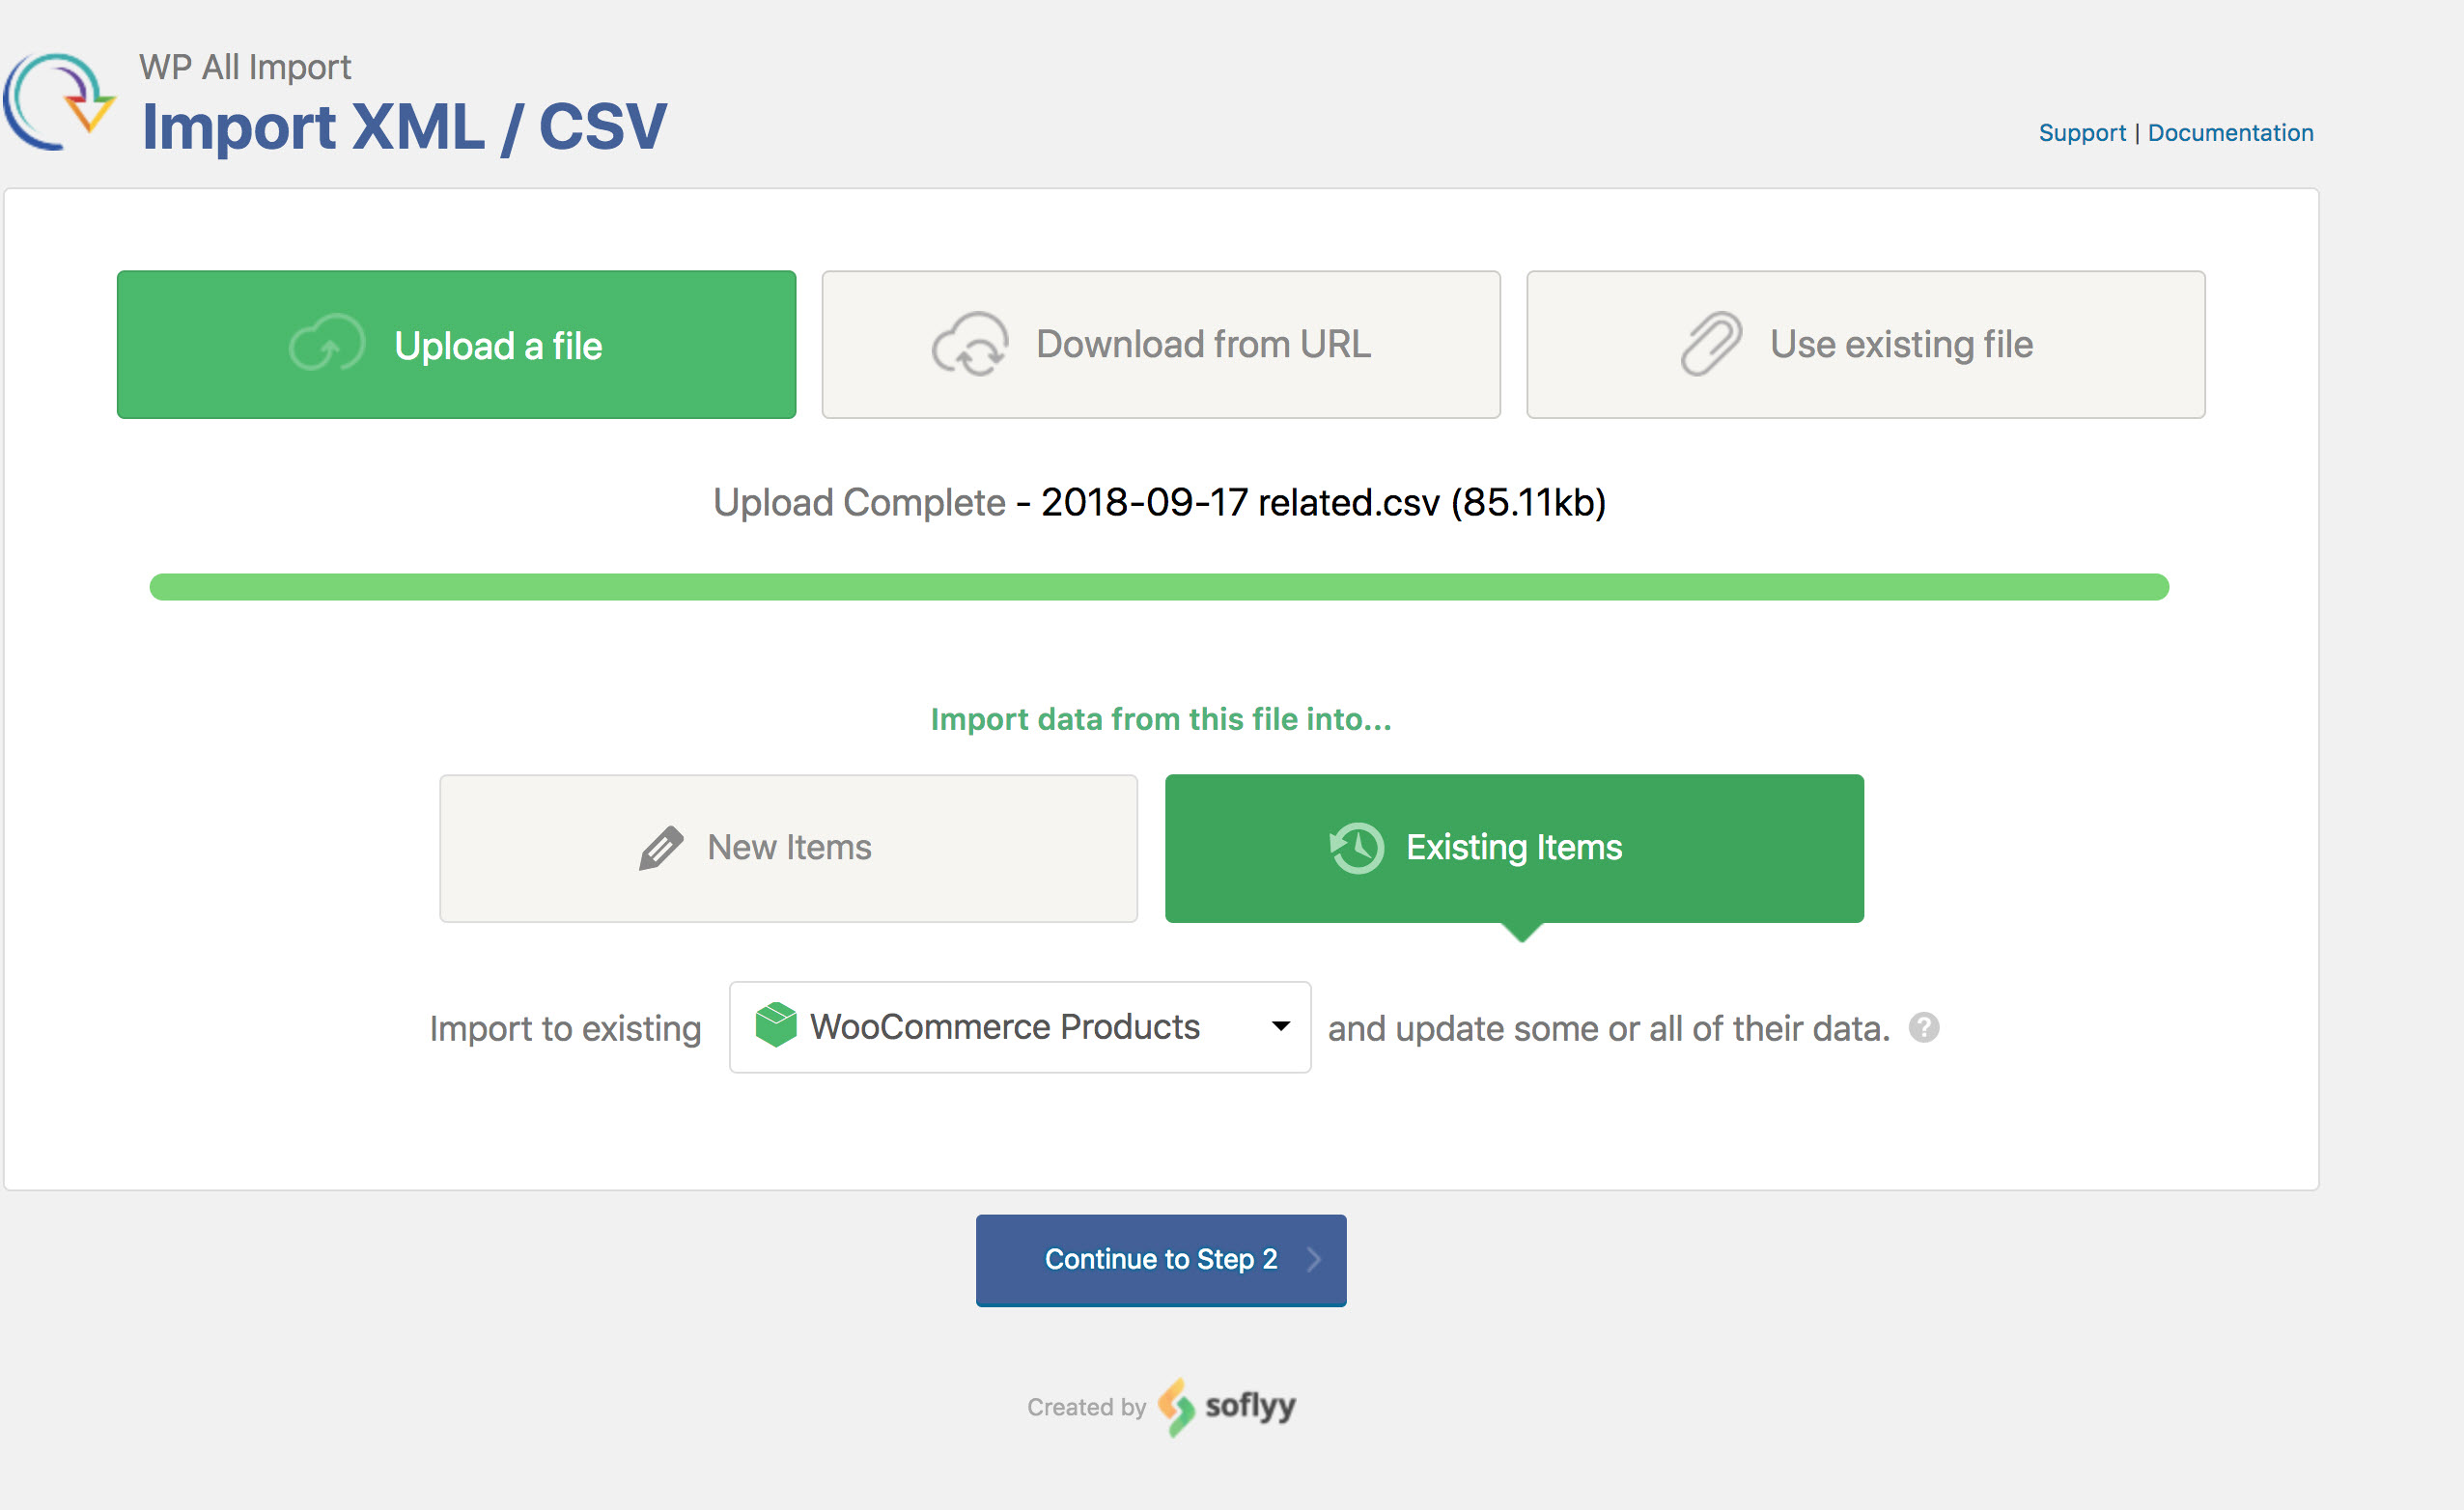
I mentioned we use WP All Export for the exporting process and funnily enough, we use WP All Import for the import process! I created a step by step to upload your CSV file once it’s ready. Happy uploading!
- Upload your CSV Data:
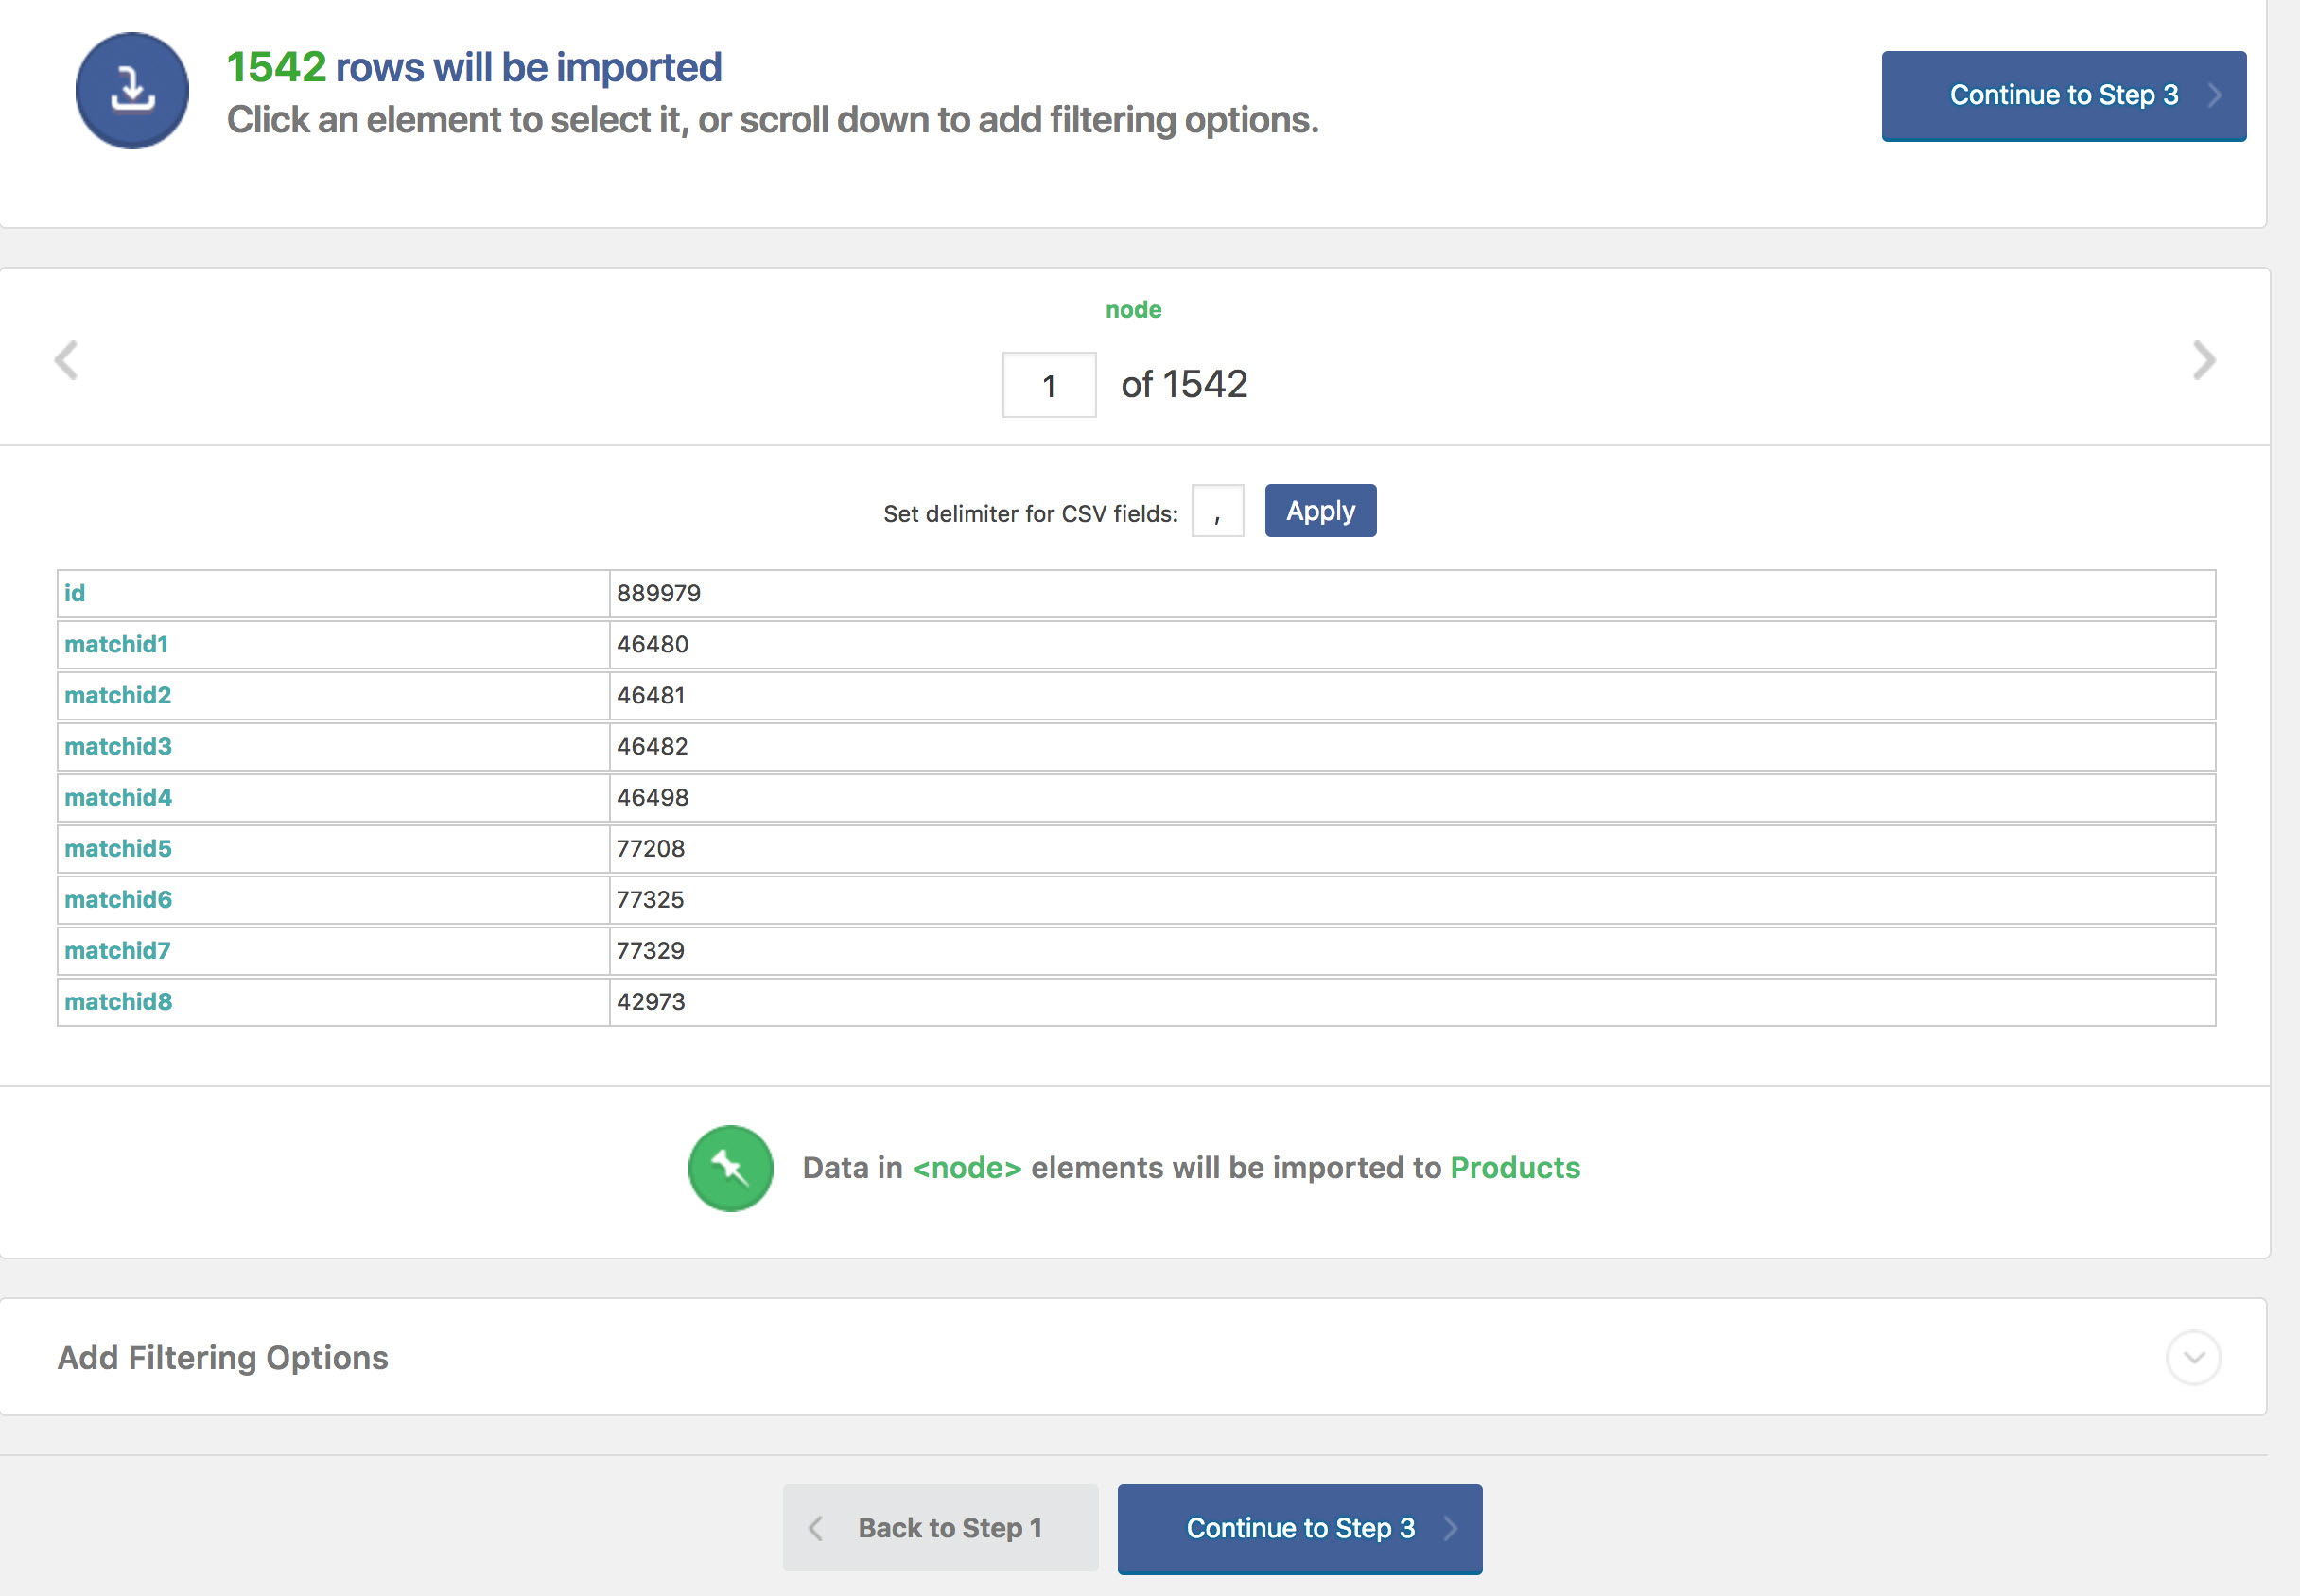
2. Check that the import data looks right before you proceed:
3. Map data to import with the WooCommerce add-on:
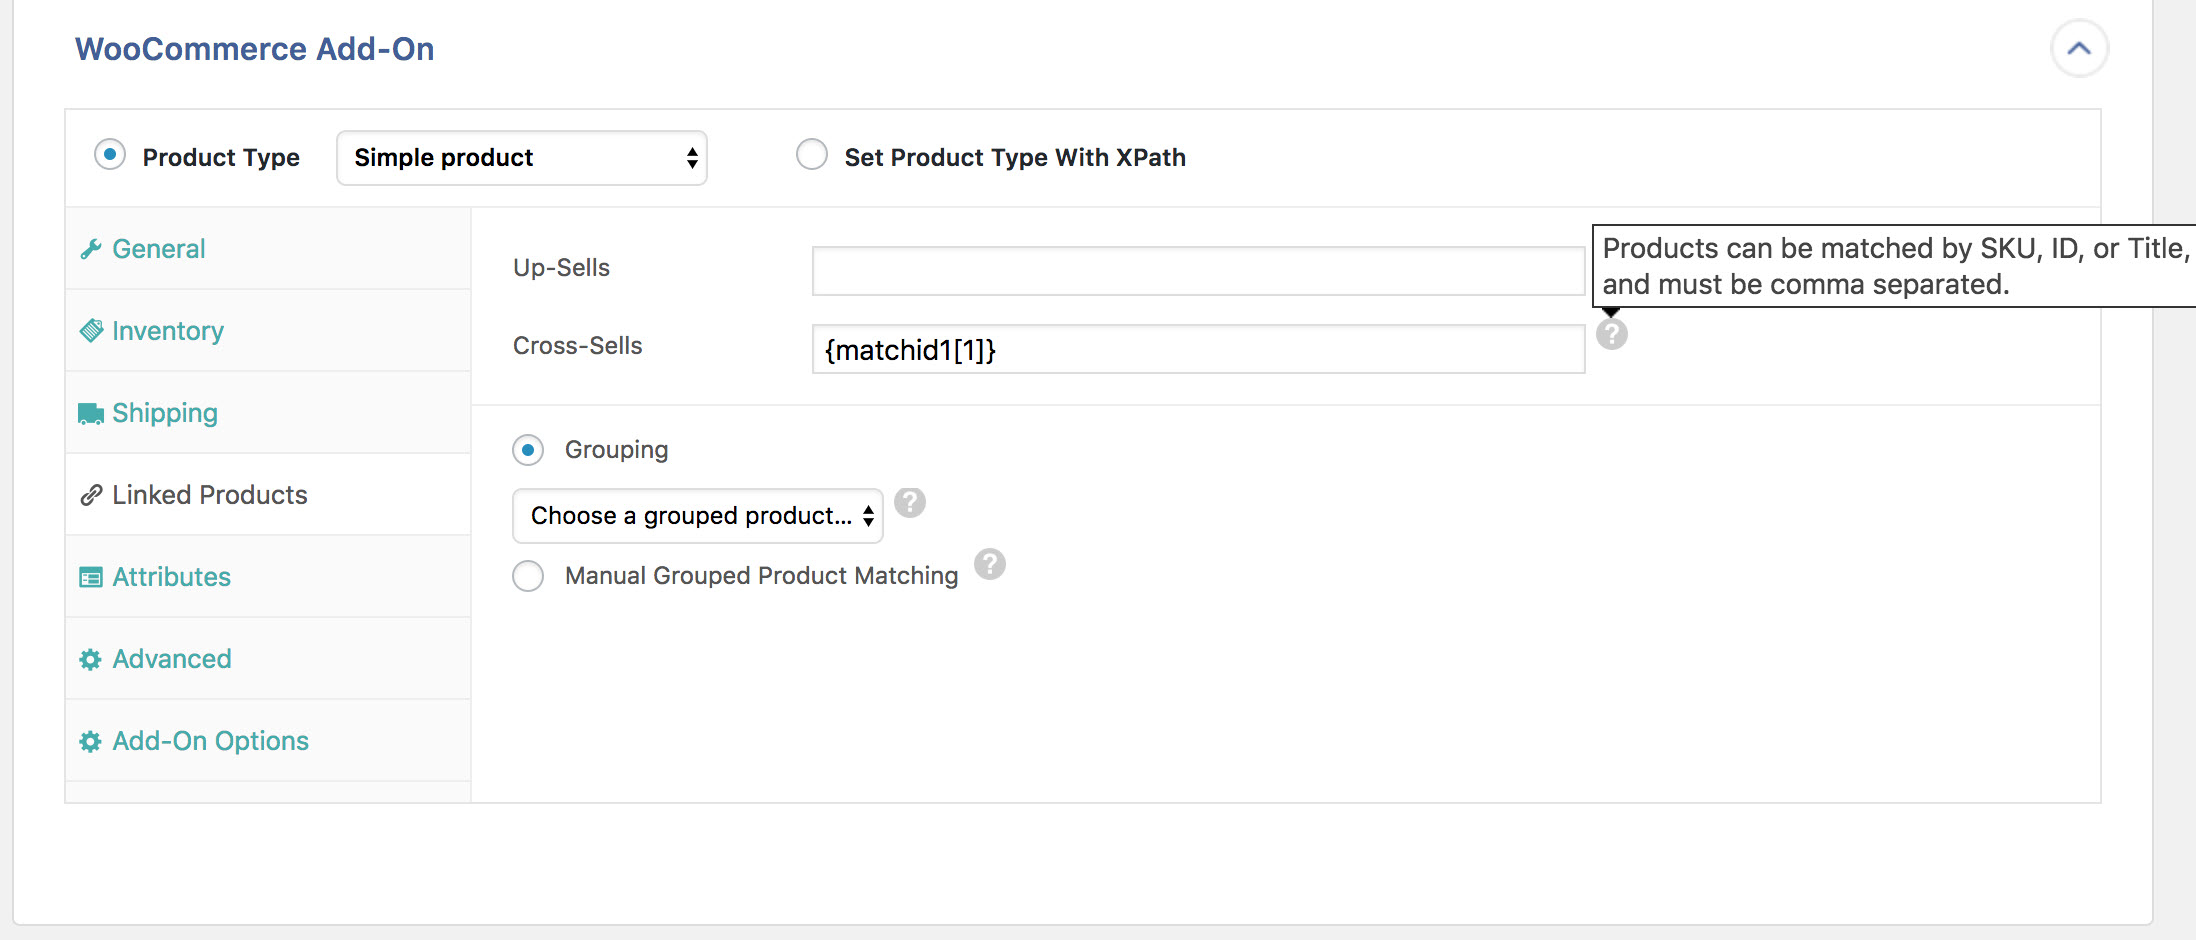
4. Being sure to add all variables for each ID:
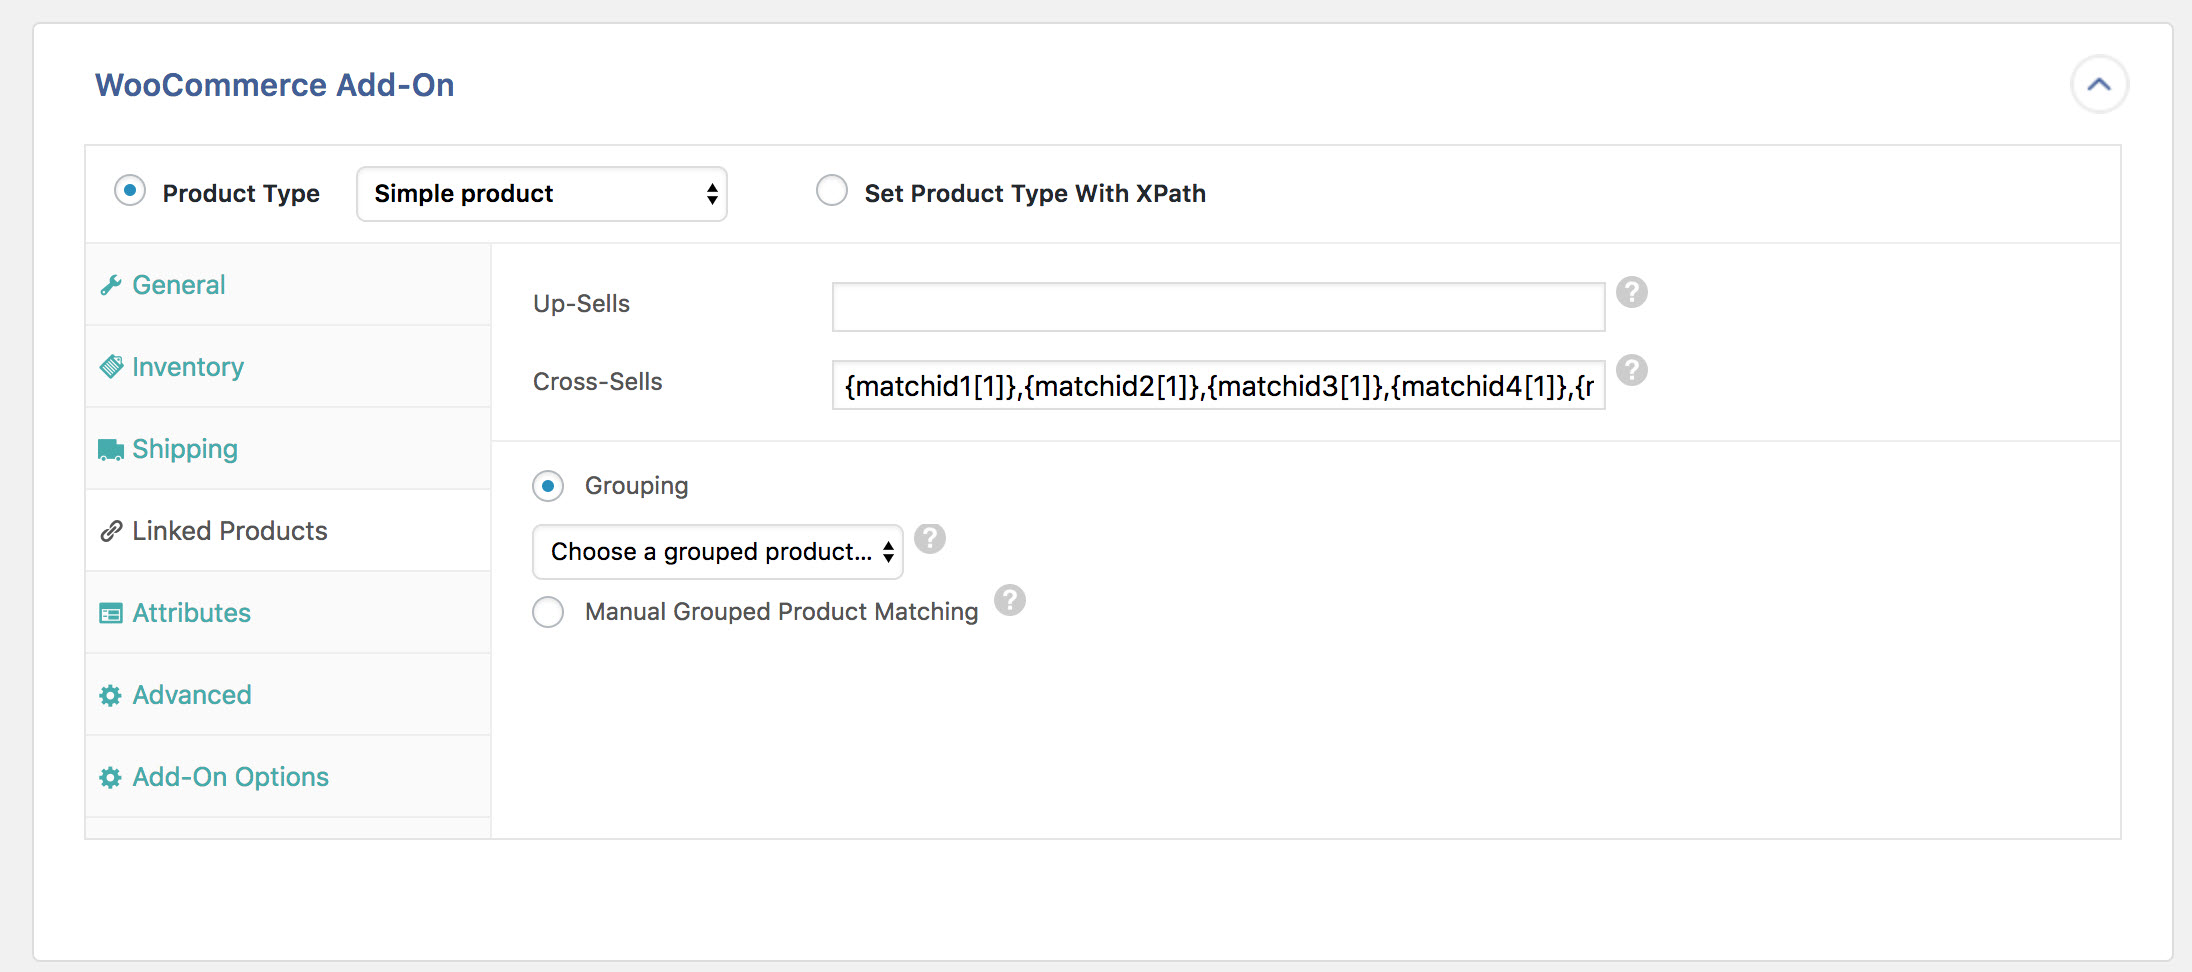
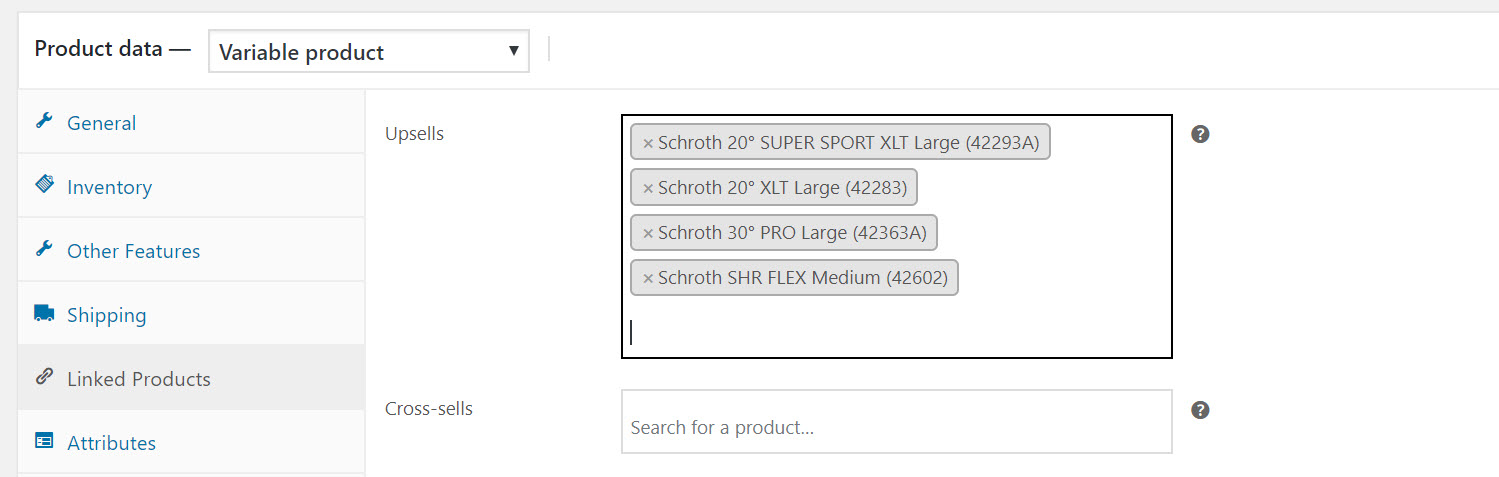
5. Match your products with cross-sell products (using the parent ID in this case):

6. Choose which product data to update (only cross-sell data):
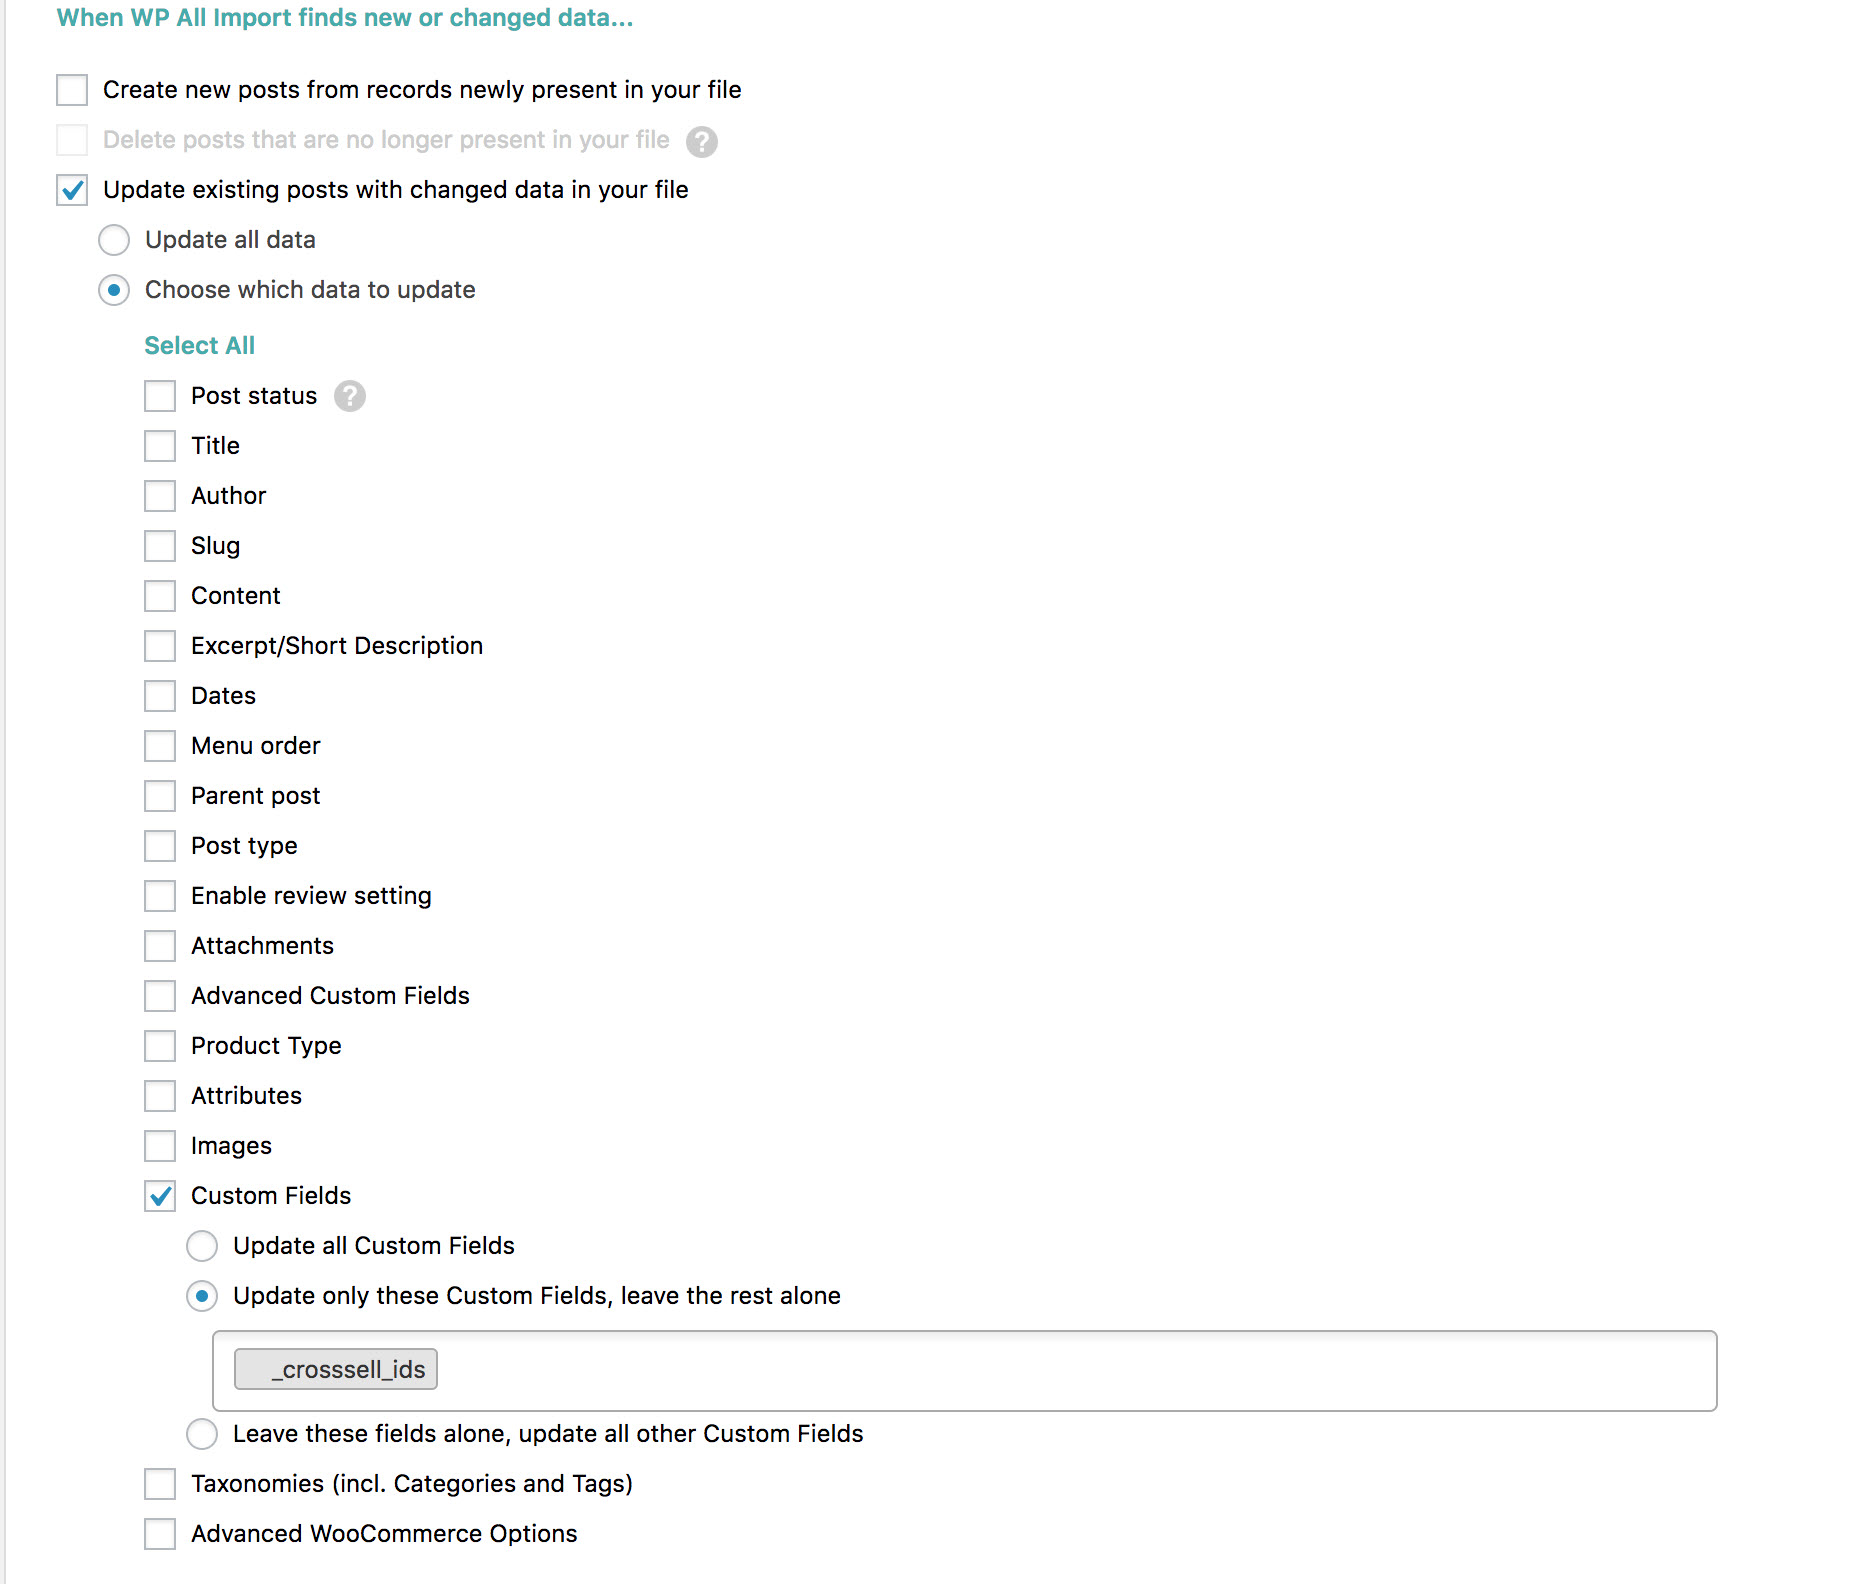
From there, run the update and let the process complete before you check the pages are updated.
As I’ve mentioned several times, I’d strongly recommend you try a few iterations of this process to suit your own needs. This article is very much a prototype – in fact, the process changed for me while I was writing this article!
I do think, though, that there’s an opportunity to include data from external sources to drastically improve your related product targeting, particularly from an SEO standpoint. Have fun experimenting with that!

Dakxim
Hello, I´ve spent all morning to get this done but when I click on “GO” ( Fuzzy Lookup ) it don´t do anything, nothing at all.
That´s too bad because I was really interested in using this strategy, it seems a good practice to increase page views, decrease bounce rate and mantain visits on the site for a longer time.
Any ideas on why the “GO” button ( Fuzzy Lookup ) don´t do anything? Any other software for Excel that can get that same function done?
Thank you for writing this strategy. It looks really good.
Richard Baxter
I’ve linked to an article specifically about fuzzy lookup in excel that I’ve written previously. Perhaps try working through the steps and see if it works.
Justin
Bravo!
The next step is to do the same with Google Sheets and FLookup, then have it automatically refresh once a week or so.
I’ve also struggled with WooCommerce’s severely-lacking Related Products functionality. I tend to use the WooThemes Recommendation Engine and the native Upsells functionality, and just turn off completely the Related Products. I felt native Related Products had improved for a while there but at the end of the day it should be customisable, exactly as you have done here.
FWIW I ended up generating two lists for each product, the first four items were “brand-heavy” ie tried to get products from the same brand, and the second four items tried to get similar products from different brands. I also put them into “upsells” instead of cross sells