The Why
The Element Visibility trigger allows you to fire a tag when a particular element (an image, form, CTA, anything!) appears in the browser’s viewport (the visible area of the page).

Tracking the visibility of specific page elements has the potential to offer far more meaningful analysis than percentage-based scroll tracking. While scroll depth can often be a valuable metric (and is now native to GTM, no plugins required!), it’s often bolted on as an afterthought. Little effort is made to differentiate between varying page types and lengths, and scroll percentages are viewed in Analytics at an aggregate level – this will seldom yield meaningful data.
More often than not, what we’re really interested in is whether the user saw something. Thanks to the Element Visibility trigger this is now easy to set up, but – unlike basic scroll tracking – doing so requires us to think carefully about our tracking requirements, our engagement goals, and our site’s measurement plan. Rebecca Brown, our head of content, put it quite succinctly:
“Effectively measuring the success or failure of content requires absolute clarity on objectives and measurable KPIs. The ability to present our clients with insights based on element visibility means this is now easier than ever before.”
The Trigger
Here’s what it looks like – I’ve indicated the 3 key areas we’re going to explore. As you’ll see, this trigger is highly configurable.
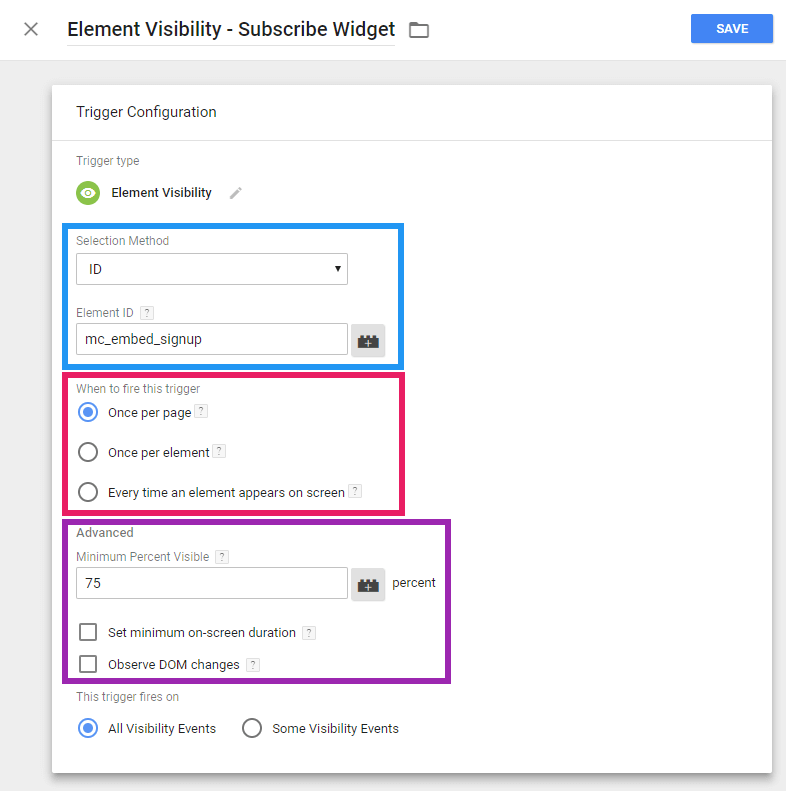
First you must configure the selection method (outlined in blue). Much like the DOM Element variable type, the Element Visibility trigger allows you to select elements using either an ID or a CSS selector. In my case I’ve referenced an embedded MailChimp sign-up form with the ID ‘mc_embed_signup’. If I were to use a CSS selector, I could create a definition which matched multiple elements using a class (e.g. ‘div.my-form’) or comma-separated list of selectors. As soon as any of your matched elements enter the viewport, your trigger will fire.
Next, we have our firing options, outlined in pink. These are fairly self-explanatory, but worth thinking about carefully – if you’ve created a selector which matches multiple elements, do you want this trigger to fire only once (‘Once per page’), or once for each matched element (‘Once per element’)? Most aggressive is the final option (‘Every time an element appears on screen’), which sets no constraints on firing – this will fire the trigger every time any matched element enters the viewport. In my case, I’ve opted to fire this trigger once per page – namely, as soon as my sign-up form becomes visible.
Finally, we have our advanced options, outlined in purple. Here we can set the minimum percentage of the element which needs to be visible for the trigger to fire. In our case, I’ve opted for 75%. Simple. The next two checkboxes are where it gets really interesting; the first allows us to set a ‘minimum on-screen duration’ in milliseconds. If we only wish to fire the trigger after our form was in the viewport for 3 seconds, for example, we would set a value of 3000. The last checkbox instructs GTM to ‘observe DOM changes’ – this enables you to watch for elements which weren’t present in the DOM when the page first loaded, and which are instead injected dynamically (based on user actions, for example).
The Tag
Let’s build a simple tag which we’ll fire with our new trigger. I’ve opted for a standard GA event tag:
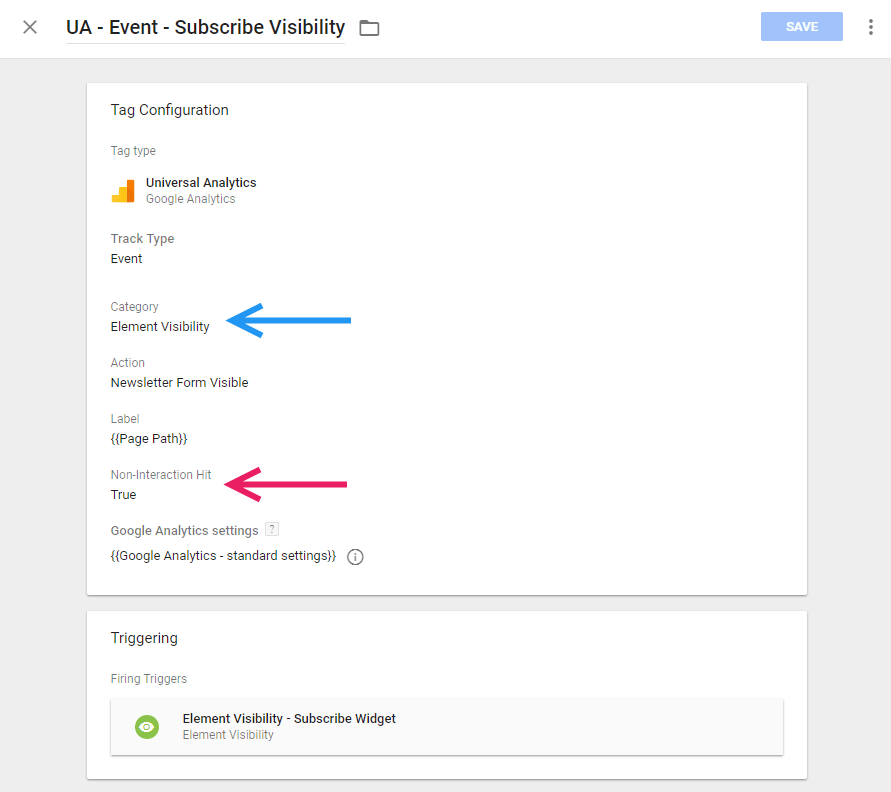
Note that I’ve created an entirely new Category (‘Event Visibility’) within my event tracking hierarchy. Rather than polluting your existing event data with these new hits – which could be extremely high in number – I’d suggest bucketing them all together. My action is ‘Newsletter Form Visible’, and my label is simply the page path.
Note that I’ve set the ‘Non-Interaction Hit’ flag to True (pink arrow). If you’re unfamiliar with this setting and how it affects your Bounce Rate, read up about it on Google Support. Essentially, by marking this event as non-interactive, I’ve opted to count single-page sessions in which this event fires as bounces. Viewing my form is passive, and if the user exited my site without submitting my form, I would count that as a bounce. This is in contrast to an actual submission of my form during a single-page session – the event attached to this action should leave the non-interaction flag at its default setting of false, thereby not counting these sessions as bounces.
Once you’ve attached your new event tag to your Element Visibility trigger, you’re good to go. As always, the Preview tool is your friend: test, test, and test again.
The Possibilities
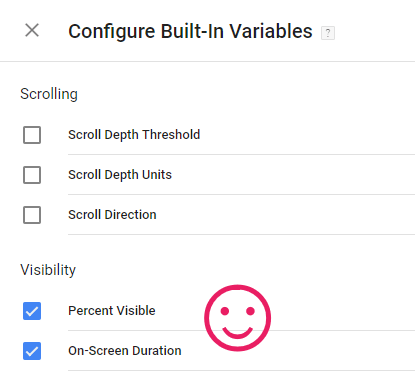
The Element Visibility trigger has huge potential, especially when combined with its associated new variables: visible percentage and the on-screen duration are now both available as built-in variables in GTM. This means you can use them throughout your setup in tags, custom JavaScript variables, and so on.
The possibilities for engagement tracking are now so diverse that my advice would be to revisit your site’s measurement plan. With the ability to track what’s being seen by your users – and even how long for – it’s possible to build a bespoke tracking setup which is laser-focused on relevant user behaviour.
Is your CTA being ignored, or simply not being seen? Are your bouncing organic search users truly leaving immediately, or in fact scrolling right down to your footer and then leaving? How often are users seeing form validation error messages? Are users scrolling right past your interactive tool, or do they dwell on it for an extended period of time? Is your related products widget positioned too far down the page and not being seen? The possibilities are endless.
Thanks for reading. Let me know what you think in the comments or on Twitter. If you need a hand with any of this then get in touch – we offer full Analytics support in-house.

Scott Bailey
Does this cover hidden elements? For example if when loaded a div had display:none then some action changed the display to block. Would this then fire?
Tom Bennet
Hey Scott. Yes, you can use the trigger for this purpose. The ‘observe DOM changes’ is particularly useful in these kinds of scenarios – it lets you watch for elements which weren’t even in the DOM when the page loaded, but which are injected based on user actions. Good luck!
Lindsay E
This is such a great feature! Thank you for the awesome post. I look forward to implementing this new tracking element.
Brett D
Hey Tom, I am implementing this feature on a website, and I have followed the steps you outlined above, yet my tag does not appear to be firing. When I inspect the tag through the Preview Debug mode, I can see a green check next to _triggers, but there is a red x next to _event. Is there another step that I need to take to complete this implementation? Do I need to write any JS for this to work? Thanks!
Tom Bennet
Hi Brett. Make sure you’ve clicked the gtm.elementVisibility event in the left hand pane of the Preview area – if it’s working, your tag should be listed there with two green ticks. If you don’t see a gtm.elementVisibility event then your trigger probably isn’t working – try reviewing your element selector! Thanks, Tom.