Standardise your UTM parameters for more coherent campaign data
Before we go into channel groupings themselves, it’s important to make sure the parameters used for all campaign data is coherent. We recommend keeping your mediums on par with the groupings Google Analytics supports, then adding more specific information on the campaign onto the optional fields.
One example: if you run prospecting and retargeting display campaigns, keep the mediums for both types as ‘display’ but prefix the campaign name with either ‘prospecting_’ or retargeting_’ depending on the type of campaign. This method also helps with our next point: adding granularity to your channel groupings.
Add granularity to your channels for richer insights
Following on from the previous point, let’s look in more detail at the channel rules themselves. Often, channel groupings are left alone, using Google’s default hierarchy and rules. While there’s nothing inherently wrong with doing this, you do miss out on a lot of key insights. One point we make is to split some pre-existing channels out to make them more insightful.
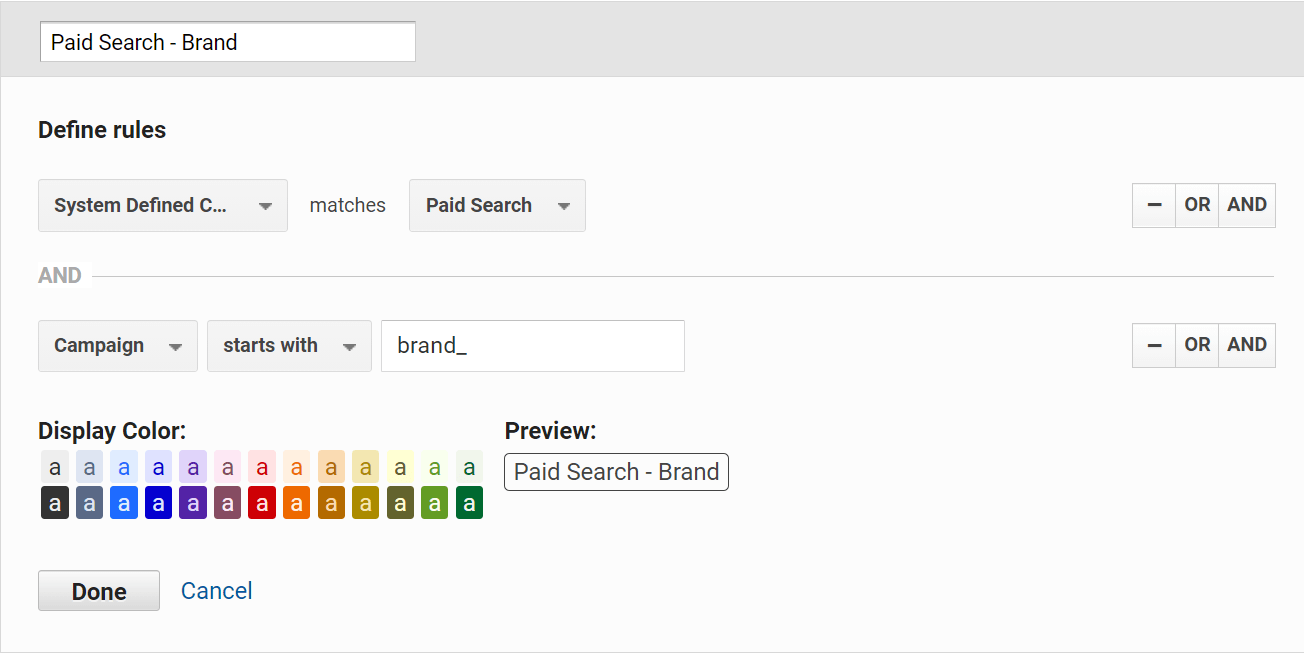
For example, if you run both branded and generic paid search campaigns, GA will categorise both as just ‘Paid Search’. This isn’t wrong but it doesn’t give much insight into how they’re doing individually. Following on from the first tip, you can create channel rules that look for specific elements within your optional campaign data, in combination with the ‘System Defined Channel’ rules which may look something like this:

Respect the channel hierarchy to avoid losing data to ‘Other’
Having specialised channels is a step in the right direction, but one aspect that is often neglected is the order of the channels during setup, which leads to traffic being grouped wrongly. When attributing traffic to channels, GA will evaluate each channel’s rules starting from the first in the grouping and if it doesn’t match that channel’s rules it’ll try the next one and so on.
We’d recommend starting with the channels with most exclusive rules then work your way down to the more open-ended channels. ‘(Other)’ will be at the bottom to group together traffic that doesn’t match any of the channels above it, but ordering channels appropriately further up the hierarchy will help avoid as much traffic as possible falling into here. You can change the ordering by dragging and dropping the eight grey dots next to the channel’s name within ‘Channel Settings’.

Amend the ‘Default Channel Grouping’ for flexibility
Now this point has been seen to be a bit controversial (and could honestly have its own blog piece) but amending the default channel groupings has many valuable benefits. Some recommend that any changes should be made in a separate custom channel grouping, as any edits to a view’s Default Channel Grouping will permanently change how new traffic is classified. While this is also great for seeing the changes apply to data retroactively it does fall short in a few areas. Here are some points in defence of upgrading your default channel grouping:
- No additional sampling impact – the Default Channel Grouping uses raw data to evaluate channel Custom Channel Groupings need to reprocess the data, which is more likely to lead into sampling issues.
- Available in Google Analytics API – data from the Default Channel Groupings are available for use outside of GA thanks to them being included within the Google Analytics API. This makes creating reporting dashboards in software like Data Studio or Tableau much easier to do.
- Compatible with GA attribution features – the Default Channel Grouping is compatible with GA’s attribution features for both standard and 360 accounts. By comparison, Custom Channel Groupings are only usable for 360 members.
- Available to all reports – the Default Channel Grouping can also be applied as a secondary dimension on any report in GA. Custom Channel Groupings however can only be applied using the dropdown in the “all channels” report or the Multi-Channel Funnel reports, and nowhere else.
Making the most of your channel groupings requires consistency across all stages of a campaign. From the creation of the campaigns to defining the channel rules to help label them, these tips should help you improve your tracking to better understand your site visitors and ultimately help you make better business decisions.
Of course, if you have any questions at all or would like more support with your data setup, we’re only one email away; head over to the data team page here for more details.
