What exactly is a PWA?
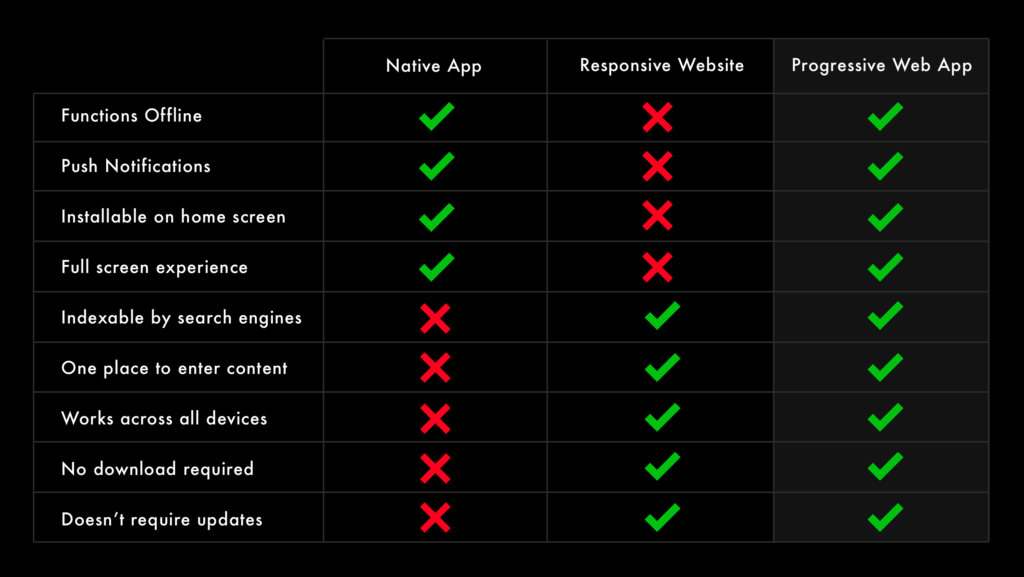
Thanks to their main functionalities – outlined below – PWAs will often result in improved user retention and performance without the complications and cost involved in maintaining a mobile app:
- Reliable: when launched from the user’s home screen, service workers enable the PWA to load instantly, regardless of the network state (more on this later)
- Fast: PWAs will respond quickly to user interactions, independently of network speed, location or device
- Installable: they have the ability to live on the user’s home screen, without the need for going through the app store
- Engaging: they offer an immersive full-screen experience and can re-engage users with web push notifications
- Progressive: they work for every user, regardless of the browser
- Responsive: they work across desktop, mobile and tablet
- Discoverable: their content can be findable through search
- Linkable: it’s easy to share the application via URL
- App-like: they look like a native app, thanks to the app shell model, which separates the app’s functionality from its content
- Fresh: when new content is published and the user is connected to the Internet, that content will be made available in the app
- Safe: because network requests can be intercepted through service workers, it’s a critical requirement that the app is served via HTTPS (no mixed content)
Source: Aleyda Solis
Four key technologies of a PWA
All of this is possible thanks to the use of four technologies, which are required for a PWA to work:
- Web app manifest file (which allows home screen access)
- Service worker (for offline support)
- Transport layer security (TLS) (ensures privacy and data integrity)
- Application shell architecture (allows fast loading times)
1. Web app manifest file
One of the main requirements for PWAs is that they should be available to install directly via a website that has already been visited, without the need for an app store. In order for Chrome to show the Add to Home Screen prompt, the app needs to provide a manifest.json file. This is a JSON file with information about the PWA and allows its developer to control how it’s launched and how it appears. You’ll be able to define properties such as the app’s name, specify home screen icons and primary colours, the page to load when the app is launched, default screen orientation, etc. An example of manifest file:
<script type="application/ld+json">
{
  "short_name": "Maps",
  "name": "Google Maps",
  "icons": [{
    "src": "/images/icons-192.png",
    "type": "image/png",
    "sizes": "192×192"
    },{
    "src": "/images/icons-512.png",
    "type": "image/png",
    "sizes": "512×512"
  }],
  "start_url": "/maps/?source=pwa",
  "background_color": "#3367D6",
  "display": "standalone",
  "scope": "/maps/",
  "theme_color": "#3367D6"
}
</script>
At this stage there is no real CSS involved besides these basic styling properties:
- short_name or name specifies what will appear on a user’s home screen. The short_name is preferred on Chrome and will be used – if present – over the name field. We recommend keeping it short, as names with +15 characters can be truncated
- icons defines an array of images of varying sizes that will serve as the application’s icon set
- start_url is the starting URL of the application
- display defines the default display mode for the web application: fullscreen, standalone, or minimal-ui
- theme_color determines the default theme colour for the application (also used to colour the status bar on Android devices)
- background_color is the background colour of the app
- description provides a description of the app
- orientation specifies its default orientation: portrait or landscape
Once you have created the manifest, you’ll need to tell the browser about your manifest file, by adding the following line to the bottom of the <head> element in your index.html file:
<link rel="manifest" href="/manifest.json">It’s recommended to add the manifest link on all your site’s pages so it will be retrieved by Google when the user first visits the application, no matter what page they land on.
To read more about the web app manifest file and how to create one, you can check Google’s recommendations here.
Besides a web app manifest that includes the above properties, your PWA needs to meet the following criteria for users to be able to install it on their devices:
- The web app hasn’t already been installed and prefer_related_applications is not true
- It meets a user engagement rule (currently, this requires the user to interact with the domain for at least 30 seconds)
2. Service worker
The service worker is what makes the PWA truly offline capable. It’s a JavaScript file that runs in the background independently of the browser and separate from a web page. They have the ability to intercept and handle network requests, caching or retrieving resources from the cache, and delivering push messages as necessary.
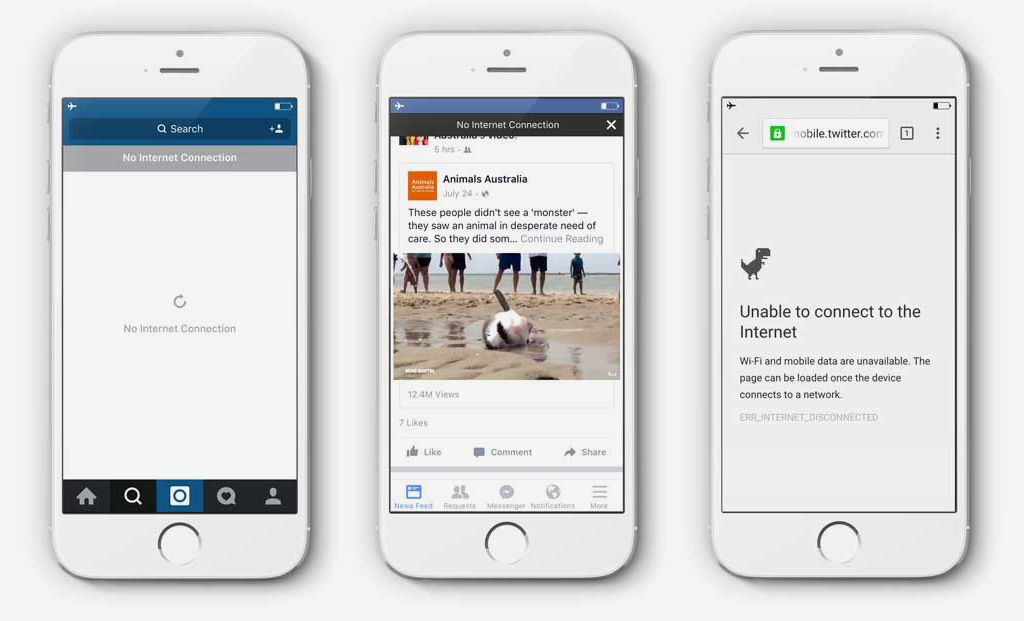
This allows the PWA to show data that was retrieved in previous sessions when a user is not connected to the internet or, alternatively, show the application shell and inform the user that they are not connected. Then, when the user establishes a network connection later, the warning is disabled, and the latest data is retrieved:
Source: Auth0.com
Furthermore, by caching all static resources with the service worker, it could drastically reduce the network requests and improve performance considerably.
For details on how to register and install a service worker, you can read this article.
3. Transport layer security (TLS)
One of the prerequisites to deploy the service worker on a site is to have HTTPS set up on your server. This is due to the service worker’s ability to hijack connections and fabricate and filter responses. For this reason, and to protect data integrity, you can only register service workers on pages served over HTTPS.
4. Application shell architecture
The application shell is the minimum HTML, CSS and JavaScript required to power the PWA’s user interface.
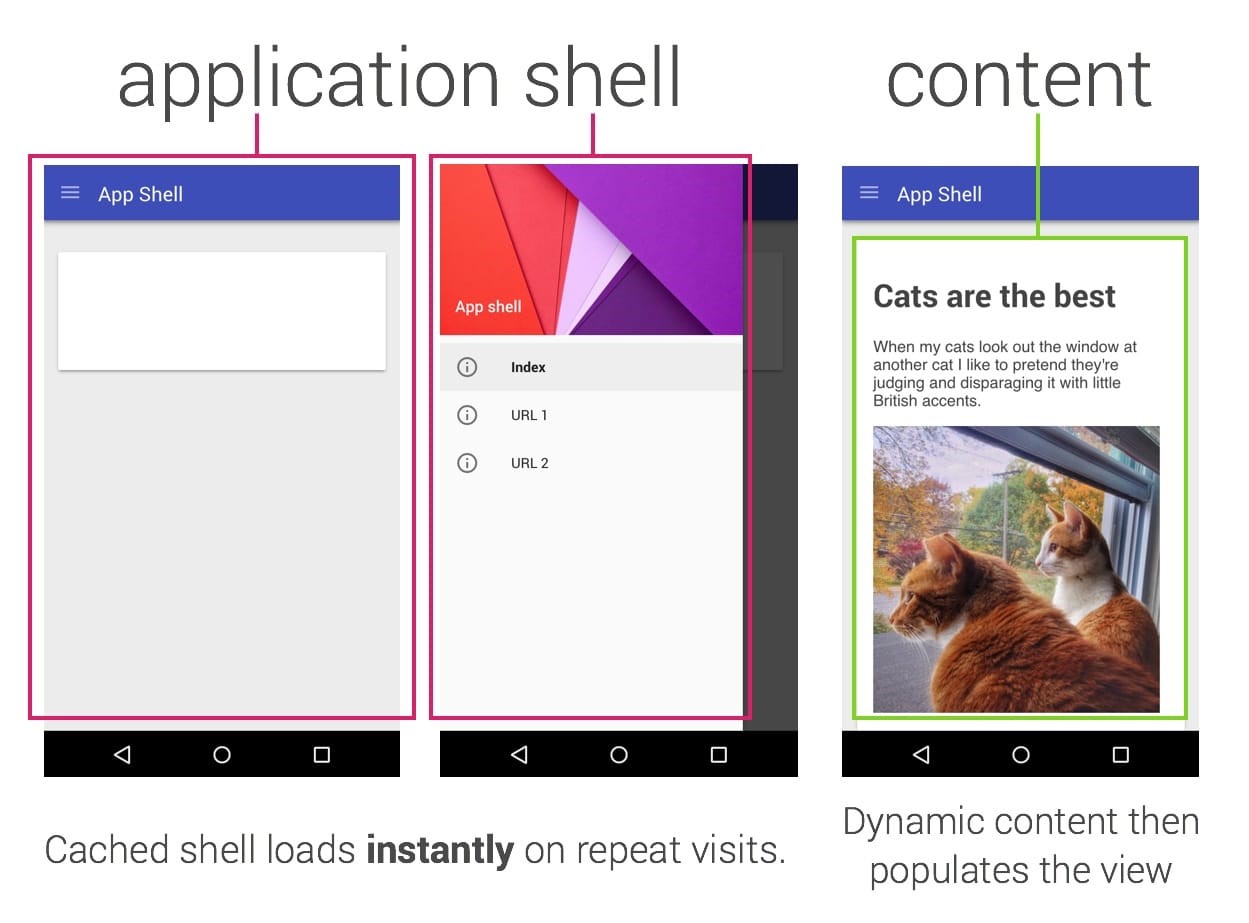
To ensure good performance and fast loading times, the application shell’s files should be cached on the first visit using the service worker so that they can be loaded instantly on repeat visits. Every subsequent time the user opens the app, the shell files will be loaded from the local device’s cache, and the PWA will only need to retrieve the necessary data (instead of having to load everything):
Source: Google Developers
This approach allows users to have faster experiences (especially for repeat visits) and allows for native application-like navigation and interactions offline.
Ideally, the app shell should be the simplest possible, but include enough meaningful content with the initial download. An app shell should:
- Load fast
- Use as little data as possible
- Use static assets from a local cache
- Separate content from navigation
- Retrieve and display page-specific content (HTML, JSON, etc.)
- Optionally, cache dynamic content
You can find here an HTML example for the below app shell for Wikipedia:
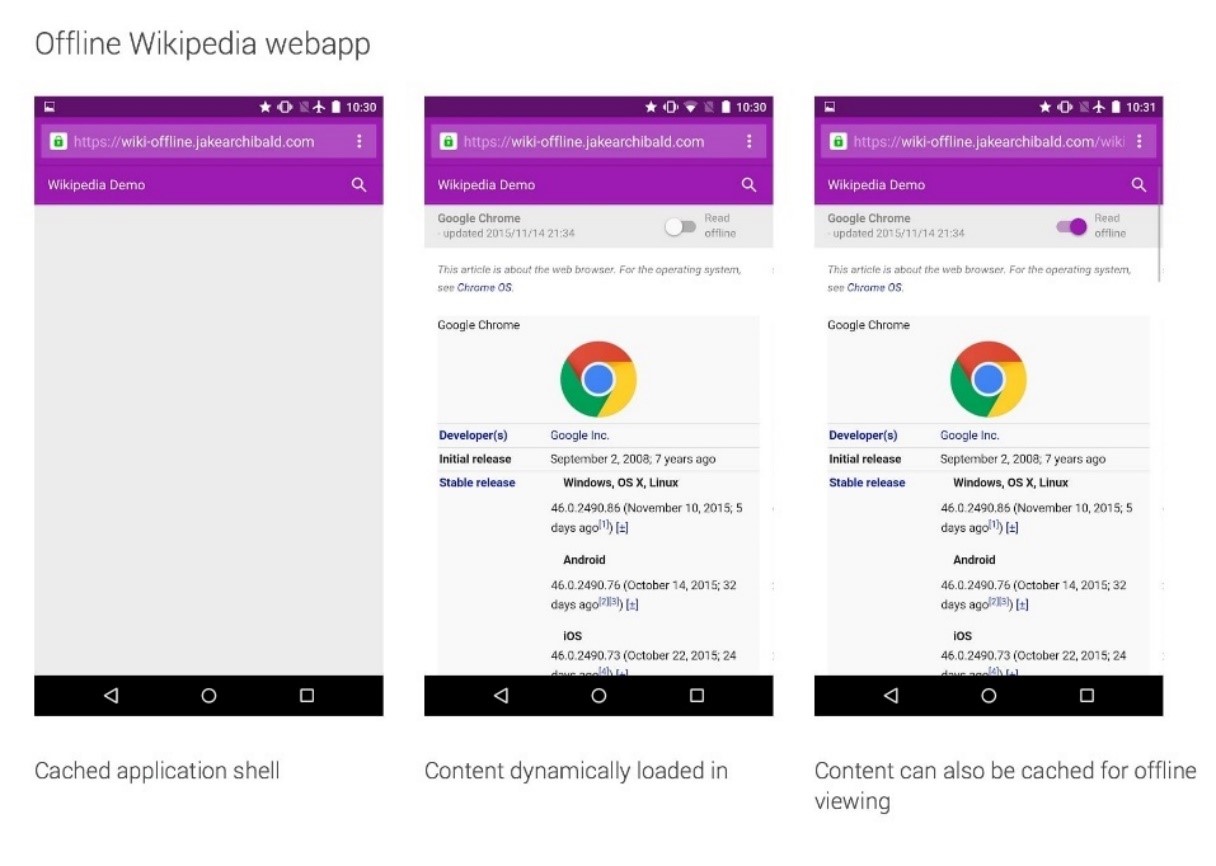
Source: Google Developers
PWA Compatibility and browser support
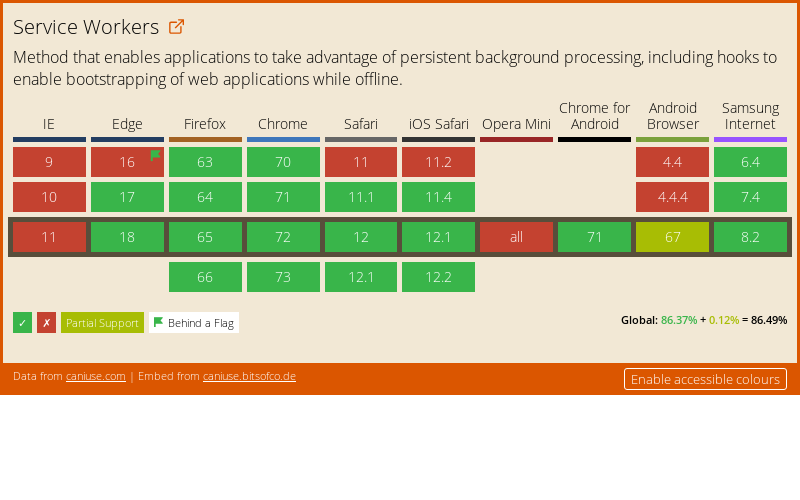
All modern browsers now support PWAs but some of their functionalities might still not be supported by some older browsers. Fortunately, this is changing quickly. You can check the browser compatibility of the PWA’s main features mentioned above on the “Can I use” website.
PWAs can also be combined with AMP-based sites. One of the main benefits of PWAs is their ability to provide fast load times, but this only happens after the first load, which means that a user may still experience slow load times the first time they use it. This is where AMP comes in.
AMP sites can be combined with PWAs in different ways:
- AMP pages with PWA features: AMP Pages can use many PWA features on their own, as long as they’re served from your origin (your site’s domain) instead of an AMP Cache
- AMP as entry point into your PWA: an AMP page will be the entry point into your site, and users will be switched to the PWA for the onward journey when it’s ready
- AMP as data source for your PWA: you can reduce your backend and client complexity by re-using your AMP Pages as data-source for your PWA
Click here for specific details on how to use a PWA and AMP technology together.
PWAs & SEO: JavaScript rendering
It’s important that PWAs are also search friendly, which means that the content of each page should be indexable. As you probably already know, Google needs to render JavaScript in order to see the content (and links). The problem is that, whilst they support JavaScript rendering, this consumes plenty of time and resources because it must be parsed, compiled and executed. For this reason, Google has to index JavaScript sites in two phases: only the server-side rendered content is fetched in the first wave of indexing and client-side JavaScript rendering is deferred until it has enough resources to do it (second wave).
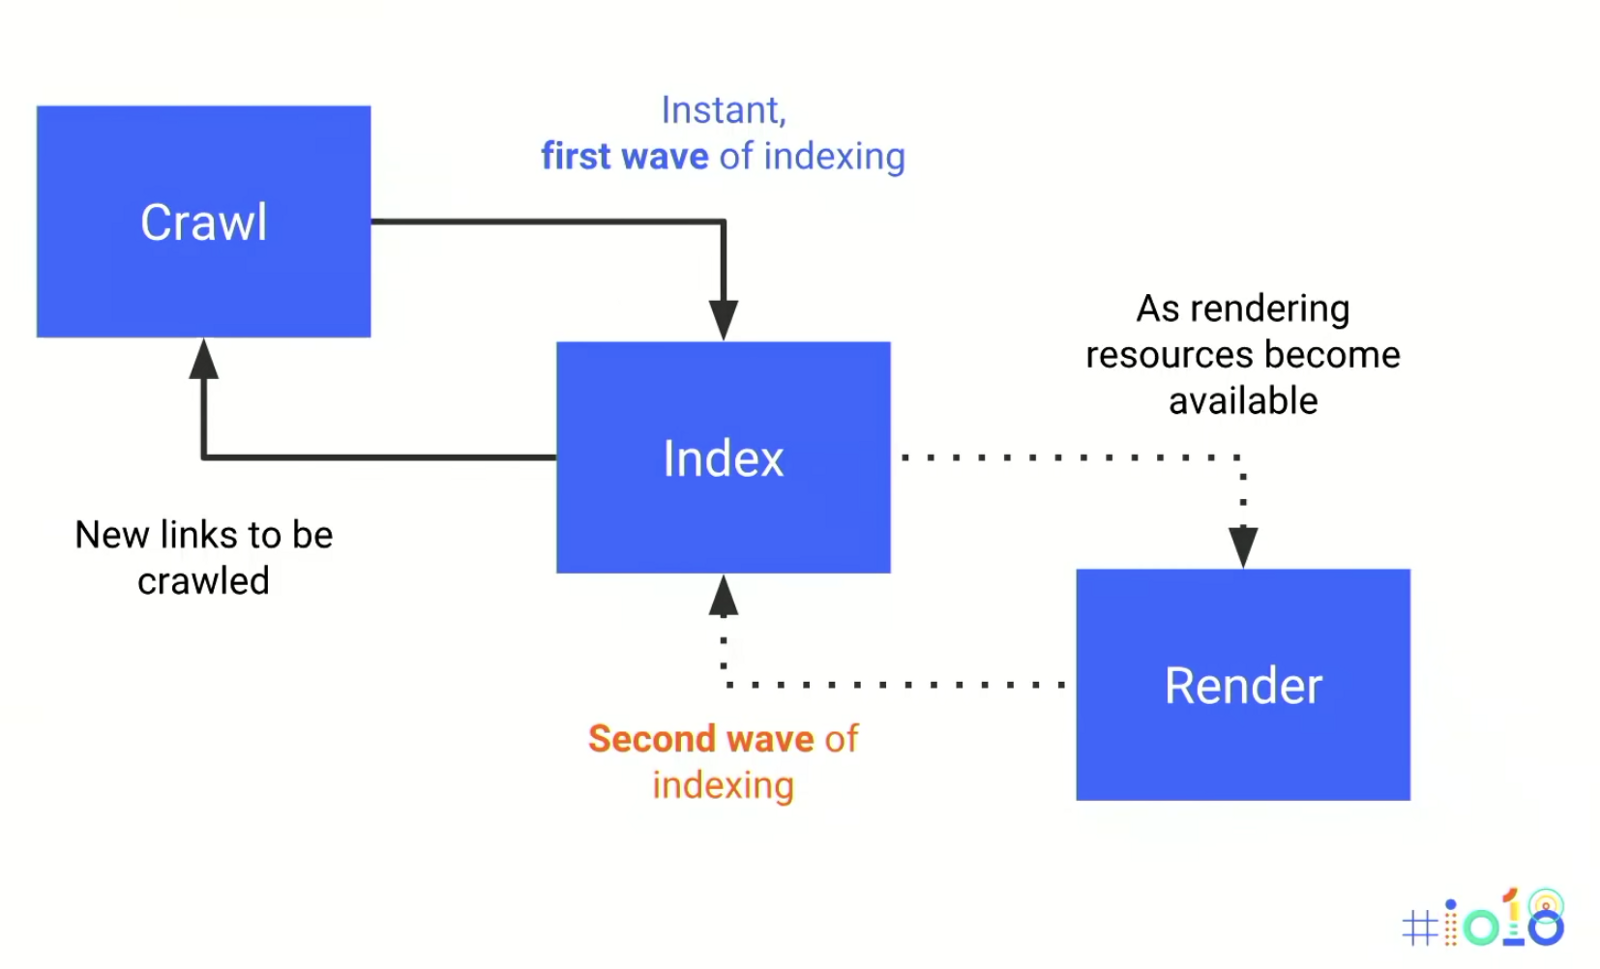
Source: Medium
In many cases the second wave of indexing will be deferred for a few days after Google first discovers a page, which can have serious implications for SEO.
It’s also worth noting that other bots, such as alternative search engines or even social networks such as Twitter and Facebook, don’t have sophisticated JavaScript processing capabilities and still rely on the raw HTML.
Due to these limitations, it is important that your server is configured to respond to requests for deep URLs with fully-rendered HTML for that page. This includes not just the application shell, but every element on the page: navigation elements, links, images, meta tags, content, etc.
There are several different ways this can be achieved. First and foremost, many JavaScript frameworks can today be configured to allow full server-side rendering (or ‘isomorphic rendering’). Here, your app runs on both the server and the browser. When a URL is requested, the server will render the page itself and send the final HTML (with content and links) to the user or the bot, which won’t need to execute any JavaScript on this initial view. Bots continue requesting URLs in this way, reliant on the server-side version of the app, while for users, this is where the client-side version of the JavaScript app takes over.
Alternatively, some of the latest JavaScript frameworks (like GatsbyJS) take a JAMstack approach. Here, fully-rendered static HTML pages are generated as part of the build process. These are uploaded to the server ‘ready-made’ and are accessed in the traditional way by both users and bots. Again, for human users, the client-side JavaScript app will take over after the initial page has loaded, thus providing all the benefits of both a PWA and a static website.
Finally, there are workarounds for where none of these approaches are feasible. Remembering that the ultimate goal is to ensure search engines can crawl, index and render content consistently, we can create and serve HTML snapshots to search engines with dynamic rendering services such as prerender.io. The HTML snapshots need to be reflective of a typical client-side fully rendered view. For this purpose, prerender.io will download and execute all of the JavaScript just like a normal client, take a snapshot of the HTML and then store the file until a request is made from a search engine.
For pages that are requested by search engines where an HTML snapshot does not yet exist, prerender.io will also create and serve the snapshot on the fly (and cache it afterwards) but the response will take slightly longer so, where possible, you should ensure pages are cached via the API to avoid slower response times.
To get prerender.io running, you’ll need to sign up, grab the Prerender token and then install the necessary middleware for your development stack, which will allow you to make proxy requests to prerender.io when a request is made by a search engine crawler, for the snapshot to then be served.
You can refer to the Github repository and prerender.io documentation for further details.
There are a few other things to consider in order to ensure search engines can successfully render your app’s content:
- For content to be indexable, it needs to sit on an actual URL – not a fragment (#). The # sign is processed by the browser only with no participation from the server (the browser sends the URI to the server but does not send the fragment)
- Proper links should be used to navigate between areas. In tests, we established that Googlebot was not attempting to crawl pagination implemented using events on spans – an <a> tag was required
- JavaScript and CSS files should be accessible to search engines, as they’ll need to be able to access them to fully render the content
- Paginated content: content that is only available after an event is triggered (e.g. a click or on scroll) may not be indexed. This can be resolved by utilising rel=next/prev and the History API
- Tabbed content: Google have stated that content hidden in tabs won’t be devalued for sites that have moved to Mobile First indexing, but several studies appear to show that this isn’t the case. It is therefore recommended that critical content is visible on render where possible
Ultimate PWA checklist
There are a few other things to take into consideration when building a PWA, some of which can be found in Google’s checklist:
- Each page should specify its canonical URL (the original one meant to be indexed) by using a link rel=”canonical” element
- When enabling a PWA alongside non-canonical AMP, a link rel=”amphtml” element should be also included to specify the AMP URLs
- Pages should be responsive on tablets and mobile devices and they should pass Google’s mobile friendly test
- If dynamic serving is used to show different designs based on the device used, then care should be taken to ensure that the content is the same – for both users and search bots
- Metadata should be provided for the “Add to Home Screen” dialog
- Make sure the site works cross-browser and test the site in Chrome, Edge, Firefox and Safari. You can use cross browser testing tools such as browserstack.com, browserling.com or browsershots.org
- When Schema.org, Open Graph or Twitter Cards are used, ensure they are included in your PWA
- Make sure the site uses cache-first networking
- The PWA shouldn’t use an app install interstitial when loaded
- Use the Network Information API to show the user an indication when they’re offline
- Content should be easily shareable from standalone or full screen mode
- Make sure page transitions don’t feel like they block on the network: pages should response immediately after you tap (tip: test it on a simulated very slow network)
- Content doesn’t jump as the page loads
- Pressing back from a detail page retains scroll position on the previous list page
- Track as many events as possible in Google Analytics (e.g. appinstalled, beforeinstallprompt, start_url, isPWAinBrowser, etc.)
For more details on how to test and validate these features, check Google’s checklist for PWAs.
The benefits of having a PWA will vary significantly depending on what your site or app does, your financial and development resources and whether or not this technology is right for your target audience. Before you start building your PWA, make sure this is going to have a positive impact on your business goals and objectives, as development will be resource intensive.
Once you’ve built your app (if you’ve finally decided to do so), make sure you test it across all major browsers and devices, and that you validate its implementation with tools such as Google’s Lighthouse, and that you complete all the checks recommended by Google on their checklist mentioned above.
Finally, don’t forget that this can have a huge impact for SEO – as well as other channels – so make sure you involve your SEO team from the planning stages to ensure this doesn’t have a negative impact on your current performance and that you maximise the benefits of having a PWA for the organic channel.
